CDAF is a set of reusable Bash and PowerShell scripts that standardise how software is built, packaged, and deployed — so your automation works the same way on your laptop, in your CI tool, and in production.
CDAF helps teams deliver software consistently, predictably, and independently of the CI/CD tools they use.
Standardise delivery Consistent automation across teams and tools
Portable by design Repeatable scripts for any CI/CD platform
Enterprise-ready patterns Proven deployment and release practices
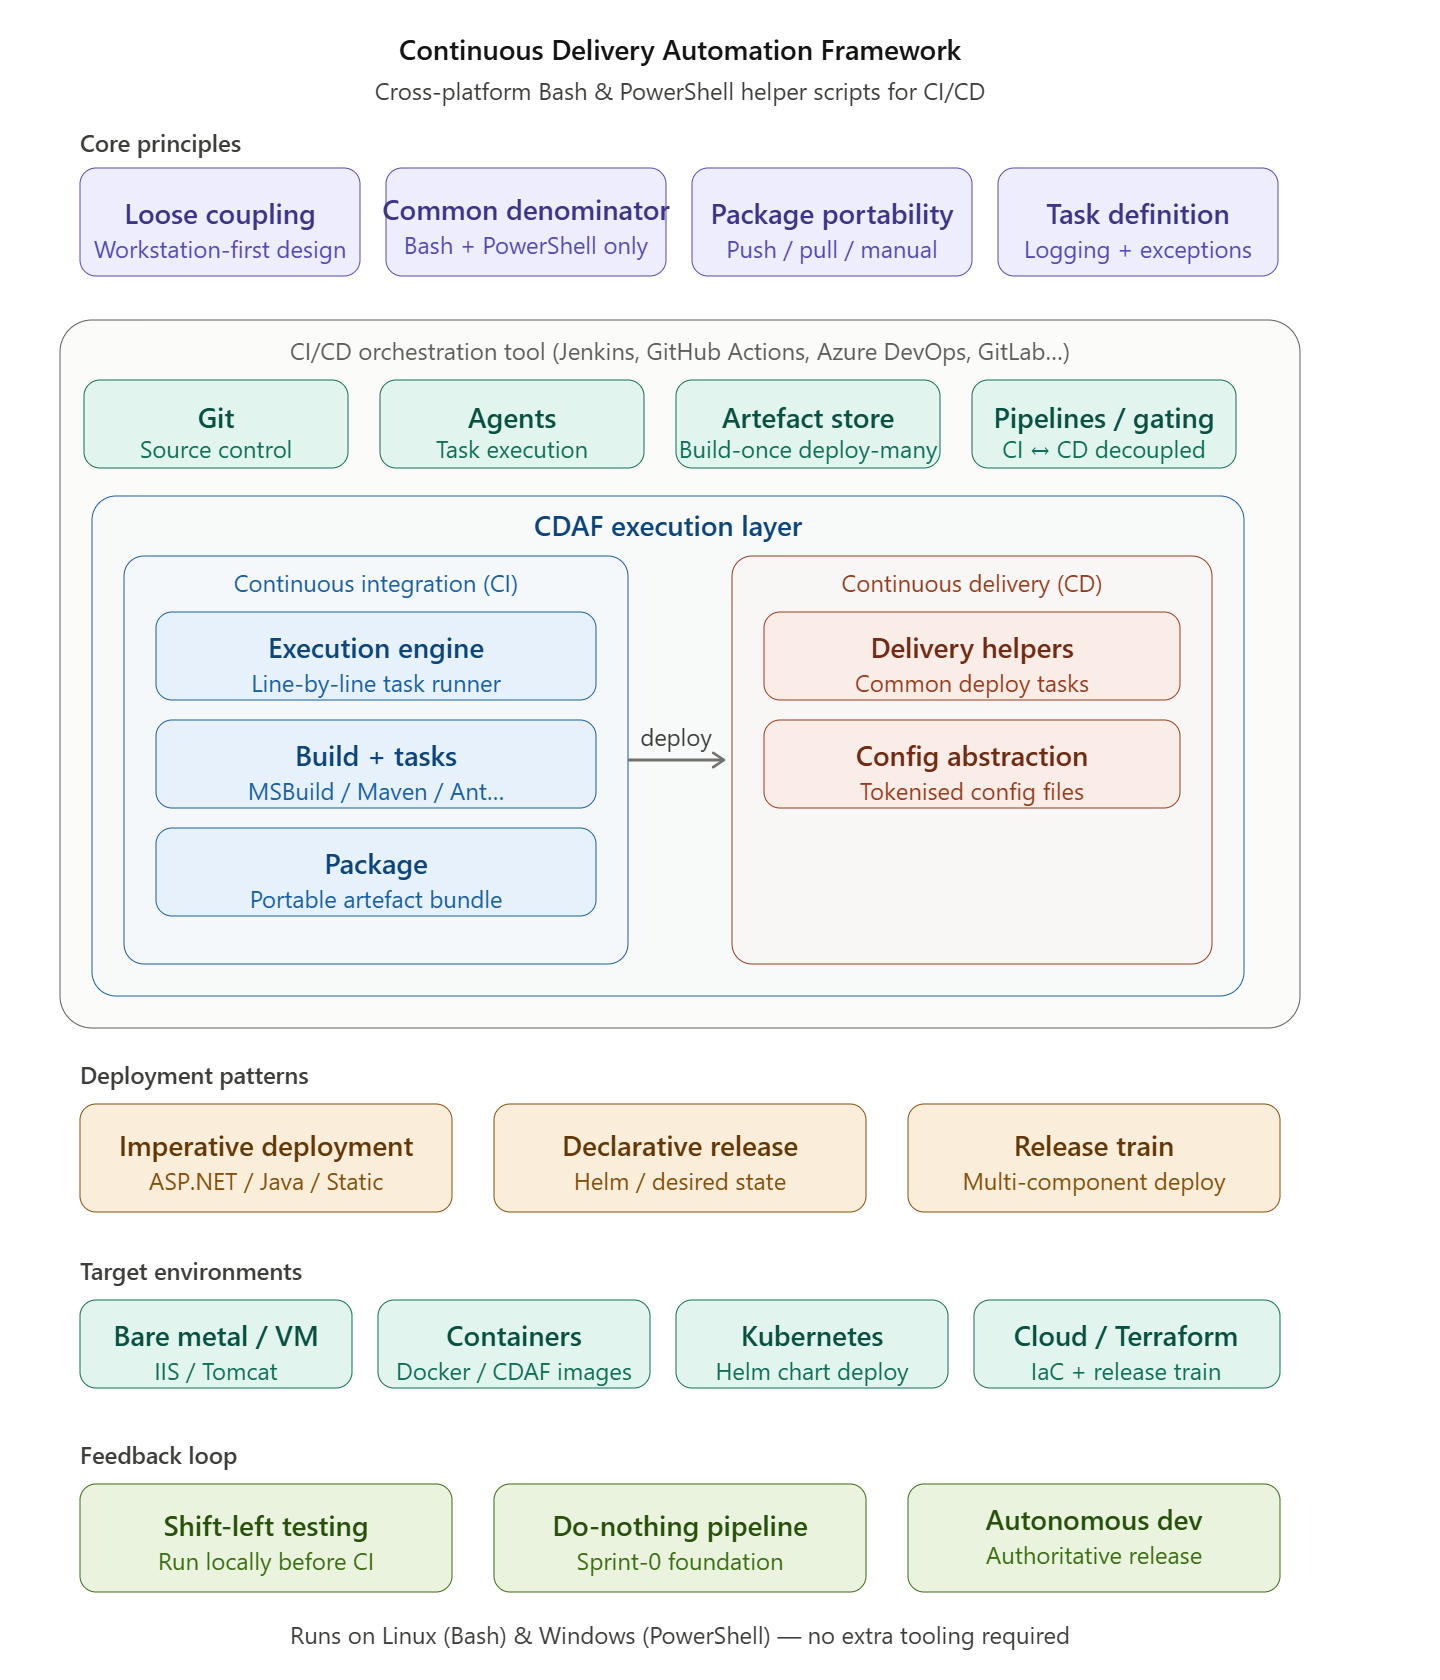
The Continuous Delivery Automation Framework (CDAF) is a collection of helper scripts written to be functionally equivalent for Linux and Windows, based on a lower common denominator that is expected on both operating systems, i.e. Bash and PowerShell, avoiding additional software provisioning where possible.
These scripts have been expanded over a decade to fulfil common tasks for continuous integration (CI) and deployment, see release history. Included is a simple line-by-line execution engine which provides common build and package functions with logging and exception handling.
CDAF is not a software framework for building CI/CD tools — it is best treated as a collection of reusable experience, saving engineers from recopying scripts between repositories. The source is freely available on GitHub; expanded articles are linked in the navigation panel.
This documentation works through increasingly complex use cases. It is discouraged to open the CDAF code and try to determine its purpose from the code (although it’s open source, so you’re most welcome). The framework uses a significant amount of dependency injection, and without an understanding of the purpose, the code will be quite difficult to follow.
What CDAF isn’t
What CDAF is
The Continuous Delivery Automation Framework Does not give you DevOps
The Continuous Delivery Automation Framework is optionated to help you achieve DevOps principles for Continuous Delivery
CDAF is not a replacement of your CI/CD orchestration tool.
CDAF is loosely coupled, allowing you to test your automation before executing in your orchestration tool.
It does not replace your build tools, such as MSBuild, Maven, Ant, etc.
It provides an execution engine for your build tasks, to cater for logging, error and exception handling.
CDAF does not know how to deploy your application nor; does it know how to manage the configuration.
CDAF provides delivery helpers for common deployment tasks. A tabular abstraction engine is provided to support tokenised configuration files
Geared for Enterprise DevOps
The framework origin is within Enterprises, deploying production systems for internal and external consumption. Although CDAF is used for product shipping, i.e. the framework is used to deliver itself, this is not its primary purpose.
Framework Principles
CDAF provides consistency in the solution build, package and delivery mechanics, providing the basis of a code driven delivery, whereby any changes to the methodology are traceable in the source control system. While CDAF focusses on the mechanics of Continuous Delivery, the CI Tools are relied upon for source control integration, artefact retention and providing a graphical user interface for features such as reviewing automated test results and release gating.
Common Denominators
The following are core capabilities of CI/CD orchestration tools, which are factored into the CDAF design.
Git
Source Control in all the documentation is oriented to Git. There is nothing limiting the use of the framework with other source control systems at all because it is loosely coupled, however, there are considerable additional features which work best with Git.
Build Artefacts
The results of the CI process can be retained and re-used in deployment process. This basic capability is critical to embrace the build-once/deploy-many principle.
Agents
CI/CD orchestration tools execute the task workload on Agents. There are a broad range of implementation styles, especially with regards to how the agents communicate with the server, and how tasks are distributed to agents, but the principle is largely the same.
some agents are obfuscated from the users, and others will execute tasks in isolated containers on the agent, which will be explored in more detail in the Containers section.
Pipelines
The capability of the CI/CD orchestration tools to decouple the CI and CD functions, with the CD operations being completely independent of source control. See starting with a do nothing pipeline.
Gating
As CDAF is geared toward enterprises, promotion to production is typically gated (Continuous Delivery) with Continuous Deployment being uncommon, therefore in this material, CD is a reference to Continuous Delivery unless otherwise stated.
Subsections of CDAF
Getting Started
Getting Started
The following guidance is language independent, i.e. does not require a development environment, and simply uses scripts to reflect a deliverable.
Continuous Integration (CI) is a critical prerequisite of Continuous Delivery/Deployment (CD).
Create a Release Package
To allow the execution of the build and package (CI) process on the DevOps Engineers machine, CDAF is used for both loose coupling and standardisation. CDAF provides a variety of features which provide consistency, especially important and the number of pipelines grow and the team members move between both squads and value streams.
Install on Windows
To install to current directory, recommend placing in your home directory, or download latest zip.
CDAF providers 4 entry scripts for different purposes.
ci : Build and Package only, i.e. Continuous Integration, mandatory argument is BUILDNUMBER
cd : Release, i.e. Continuous Delivery or Deploy (depending on gating or not), mandatory argument is ENVIRONMENT
cdEmulate : Executes ci and then cd, generates BUILDNUMBER if not supplied and uses configurable ENVIRONMENT
entry : Executes ci and then cd, generates BUILDNUMBER if not supplied and uses configurable ENVIRONMENT(s)
Release Package Creation
With the focus being delivery, not development, the creation of a consistent, self contained release package is a core CDAF feature used for both component delivery and stand-up/tear-down capabilities. The output of the CDAF CI processs is a single release.ps1 file. See Self-extracting release article.
A key principle of the Continuous Delivery Automation Framework is loose coupling. This gives the automation developer the ability to run the automation process on their workstation, well before executing in the pipeline tooling. This principle should be retained where possible so that troubleshooting and feature development can be brought closer to the developer.
a loosely coupled solution can allow migrating from one pipeline tool to another with minimal effort.
Seed your solution
To seed a new solution, the minimal requirement is a directory with a solution file CDAF.solution
The minimum properties are the name of your solution, and the versioning prefix. The resulting artefact will have the build number appended to the release package, e.g. the first build will be 0.1.1, then 0.1.2 and so on.
solutionName=mycoolproductartifactPrefix=0.1
Continuous Integration (CI)
With CDAF installed on your path, you can now test the solution by running the Continuous Integration entry point
linux
ci.sh
windows
ci
Many things will happen, however the key observation is that a file called release.sh for linux or release.ps1 for windows will be produced, this is the build artefact that can be consumed by the Continuous Delivery (CD) stages. See minimal sample for an executed example.
Shift-Left & Fail-Fast
Now that you have the bare minimum, apply it to your CI/CD toolset immediately. We want to have a green pipeline from the start to trap any problems we may introduce in subsequent steps.
CDAF provides a loose coupling for core CI & CD objectives. The intention is that the CI & CD processing is performed on the developers desktop, and then executed in the same way in the pipeline tool. By establishing a healthy pipeline as soon as possible, any pipeline failures can be quickly and incrementally identified. See Entering Sprint-0 for elaboration.
Pipeline Orchestration and Capabilities
The CI process gathers files from source control, then uses the CDAF CI entry point to produce the release package. The pipeline tool then stores the release package for reuse in subsequent deploy processes.
graph LR
  subgraph CI
    git[("Source Control")]
    bp["Build & Package"]
    registry[("Artefact Store")]
  end
  qa["✓ qa"]
  pp["✅ pp"]
  pr["✅ pr"]

  git -->
  bp -->
  registry -->
  qa -->
  pp -->
  pr

classDef dashed stroke-dasharray: 2
class CI dashed
After the CI process, the pipeline tool may perform additional value add processes that are not directly related to delivery, i.e. publishing test results or code coverage.
The pipeline then retrieves the release package, and then triggers one or more deployments to promote a release to production. This is the CD process.
graph LR
  git[("Source Control")]
  bp["Build & Package"]
  subgraph CD
    registry[("Artefact Store")]
    qa["✓ qa"]
    pp["✅ pp"]
    pr["✅ pr"]
  end

  git -->
  bp -->
  registry -->
  qa -->
  pp -->
  pr

classDef dashed stroke-dasharray: 2
class CD dashed
The triggering of each stage of the promotion can be immediate (indicated with ✓ in the diagram above) or require a manual approval (✅), but it is expected the deployment process itself is fully automated once it has been triggered.
Using the seeded solution from the previous material, it is recommended that this is executed in your pipeline as a do nothing verification. See the orchestration examples in GitHub for guidance:
Continuous Integration (CI) is the objective of bringing code branches together and building them to produce a consolidated artefact. This shift-left approach ensures the efforts of multiple contributors are combined and tested regularly. The testing within CI typically starts with unit testing, and that should be included in the build task. For some ecosystems this is an implicit or parameterised part of the build command, others, it’s separate command.
How does it work
CDAF will process all build.tsk files in the solution root, then all the build.tsk files found in one level of sub-directories.
The build.tsk files are processed line by line, each line is logged and then executed, with errors and exceptions trapped and logged. In the case of linux the error processing is based on the exit code and standard error, while windows has a broader range of errors, such as halt and exception conditions.
For this material, the build output is a simple script, for some language specific examples see:
Set-Content build.tsk 'Set-Content runtime.ps1 "Write-Host `"Deploy %integer%, property set to : %property%`""'Add-Content build.tsk 'REFRSH runtime.ps1 output'
Continuous Integration (CI)
The build.tsk is a CI task so only need to execute
ci.sh
or for windows
ci
The build process will now be triggered, this can be observed in the log build.tsk found in solution root, this will produce a directory called output, however, this will not be included in the release file, which will be covered in the next step.
Package
Now that build artefact has been created, create a deployable package.
An objective of Continuous Delivery is to have a predictable, repeatable, deployment process. A fundamental principle of CDAF to achieve this producing an immutable release package. This decouples the deployment process from the source management process. The release package is a self-contained deployment asset, and should be executable anywhere, i.e. on the automation developers desktop, within the pipeline or even manually file transferred to a remote server.
Artefact Retention
In the Configuration Management step, a default release package was created which contained properties files. The following step defines the solution specific artefacts which need to be available at deploy time. These are typically compiled binaries, but can be any set of files and/or directories.
Retain the output from the previous build task.
Linux
echo 'output' > .cdaf/storeForLocal
Windows
Set-Content .\.cdaf\storeForLocal 'output'
Build & Deploy
Use the continuous deployment emulation entry point.
cdEmulate : Executes ci and then cd, generates BUILDNUMBER if not supplied and uses configurable ENVIRONMENT
Linux
cdEmulate.sh
windows
cdEmulate
Inspect the directory TasksLocal, and will now contain the output directory produced by the build task. Test the artefact
Linux
./TasksLocal/output/runtime.sh
windows
.\TasksLocal\output\runtime.ps1
This should output the following:
Deploy %integer%, property set to : %property%
Other File Locations
There are three artefact definitions file names, depending on context, local, remote or both:
storeFor
storeForLocal
storeForRemote
Other directories within your solution directory which will also be automatically included in the root of your deployment directory. Based on the suffix these will be placed in a local context, remote context or both. See the following sections for how these contexts differ.
crypt
cryptLocal
cryptRemote
custom
customLocal
customRemote
An explanation of the local and container extensions will be explained in following sections.
Continuous Delivery/Deployment
Deploy the artefact using the created package, along with Configuration Management.
Continuous Integration (CI) is a critical prerequisite of production-like stand-up/tear-down, i.e. if it can’t be build on the engineers machine, it can’t be deployed from the engineers machine.
Configuration Management and Automated Deployment
Configuration Management
CDAF origin was to ensure consistent configuration of servers across environments, based on a source of truth. The partner construct to this approach is tokenisation, i.e. a way of abstracting environment variations away from the syntax of the consuming application.
Tabular Properties
To provide a human readable, single pane-of-glass view of the multiple environment configurations, a tabular approach is used. An example of this follows. The first two columns, context and target are mandatory, all others can be any values needed for your solution.
context  target  property
local    TEST    test.server.comain
local    PROD    production.server.domain
Configuration Management files should never container sensitive data or secrets. These are supplied as variables, see more on sensitive data strategies.
The configuration management tables can be any file name with .cm extension, in your solution root. All .cm files are processed prior to the build task in the CI process.
Extend the Seeded Solution
Based on the seeded solution, add a properties.cm file to the solution root.
Retest your solution, but this time, execute the end-to-end process
Linux
cdEmulate.sh
Windows
cdEmulate
The resulting CD process will not perform any action, however, the release package will now be extracted and there will be a directory TasksLocal, and in this will be the sub-directory based on the property context, propertiesForLocalTasks. In this directory will be the two properties files, compiled from the properties.cm file, TEST and PROD respectively, e.g.
property=Test Property
integer=1
Tokenisation
The partner files in source control are in whatever syntax required by the application, with tokens only for values that vary between environment. By default, tokens are in the form %name%. Following examples highlight how the configuration management is intended to provide an abstraction from the complexities of the application configuration files.
Local Tasks use the same execution engined as build tasks, but at deploy time, rather than build time. Local Tasks are executed in the local context of the host/server. Local Tasks are suited to situations where the agent is installed on the server where tasks are to be performed, or the server that the agent/runner is installed has the tools required to perform tasks on a remote target, i.e. a service offering with a command line interface, such as Kubernetes, Azure or AWS.
The CDAF capabilities with containers cater for more sophisticated uses in the local context and the alternative container tasks execution approach.
Example Task
The default tasks that are run in the local context are tasksRun.tsk and tasksRunLocal.tsk. These are placed in your solution root.
Two steps are performed, first the deployable artefact is detokenised
Found %property%, replacing with Local Context
Found %integer%, replacing with 1
Then executed to verify the environment specific properties.
Deploy 1, property set to : Local Context
This now completes an end-to-end example of CDAF, from configuration management, build & package through to deployment. Following are some common additional configuration elements, and the final step covers the increasingly less common pattern of Remote tasks.
Alternate Tasks
If you require a variety of tasks, you can explicitly define them, which will ignore any tasksRun.tsk and tasksRunLocal.tsk in your solution root. Please your task files in directory named either custom or customLocal in your solution root.
To map your configuration to the alternate tasks, you must use the column name deployTaskOverride.
context  target  deployTaskOverride     databaseFQDN        dBpassword
local    TEST    simple-db-deploy.tsk   db1.nonprod.local   $db1Pass
local    UAT     simple-db-deploy.tsk   $db2Pass
local    PROD    cluster-db-deploy.tsk  $prodPass
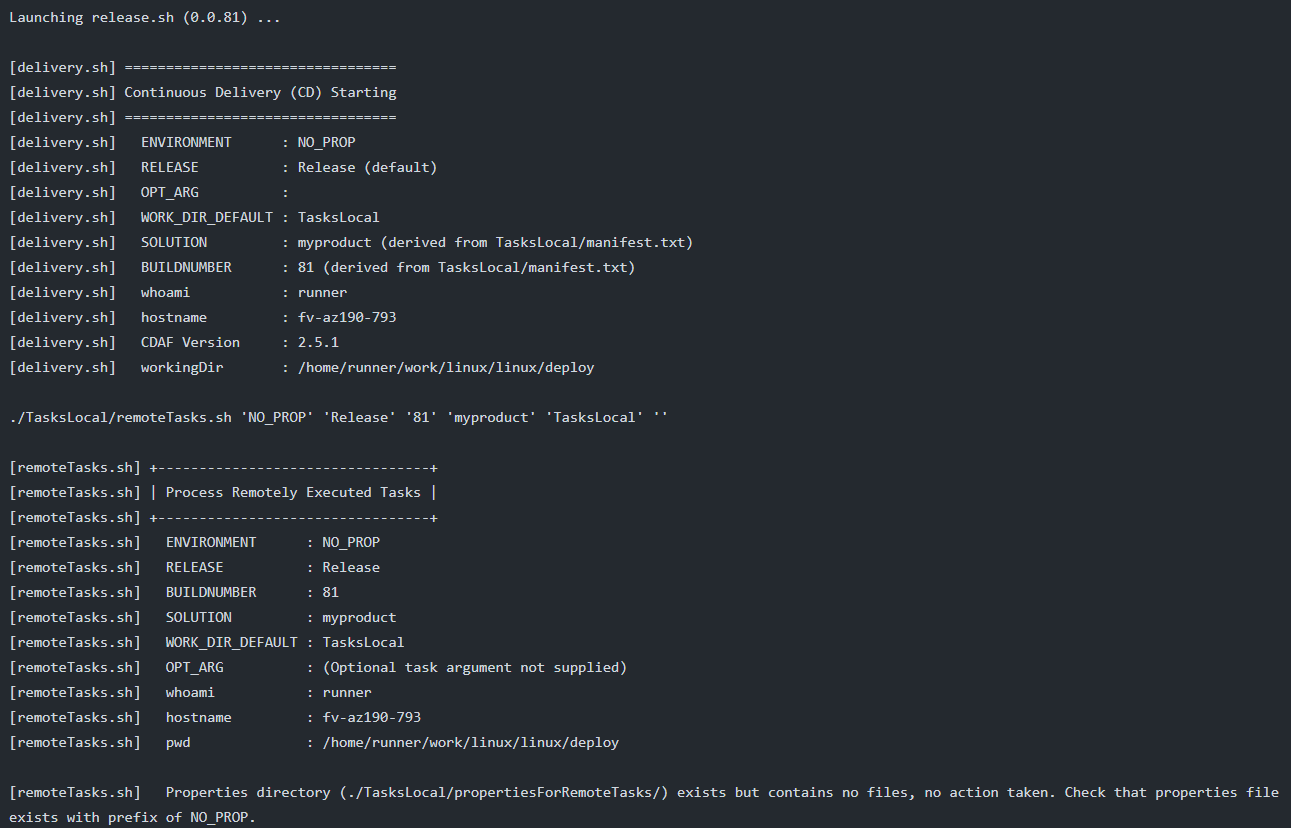
Remote Tasks
Tasks run in a remote context. This approach is less common with the license barriers to installing deployment agents, and the client oriented nature of modern agents, making the need for push deployments less common.
Like Local Tasks, Remote Tasks use the same execution engined as build tasks, but at deploy time, rather than build time. Remote Tasks are executed in the local context of a remote host/server. Remote Tasks are suited to situations where the agent is not installed on the server where tasks are to be performed and instead the deployment is pushed, i.e. to an application server in the DMZ which can only be accessed by Remote PowerShell or SSH.
The Remote Task is executed in a local context, so all the processes described in Local Tasks, however, how the deployment package is made available to the execution engine differs, along with pre-execution steps to make execution on the remote host possible.
SSH/SCP or Remote PowerShell with custom file transfer
Remote PowerShell for Windows or SSH/SCP for Linux are the protocols used to transfer the Remote Task package to the remote host for execution. PowerShell does not have an file transport protocol (Windows is typically reliant on SMB) so a CDAF feature has be provided to allow a file transfer mechanism similar to SCP in Linux.
Nested Package
When using Remote Tasks, a reduced set of CDAF helper scripts are packed into a nested compressed file. This file is transferred to the remote host and then unpacked. Once unpacked, the properties for the current release environment are transferred to remote host, and then the deployment is executed.
Remote Task Configuration
The default authentication for transferring the remote files is pre-shared keys for Linux and domain service principle for Windows, however, alternative authentication methods are supported.
Minimal build will produce a single build output, release.ps1.
[cdEmulate.bat] --------------------
[cdEmulate.bat] Initialise Emulation
[cdEmulate.bat] --------------------
[cdEmulate.ps1]   ACTION              : (not supplied, options cionly, buildonly, packageonly or cdonly)
[cdEmulate.ps1]   BUILDNUMBER         : 773 (auto incrimented from C:\Users\vagrant\BUILDNUMBER.counter)
[cdEmulate.ps1]   REVISION            : release
[cdEmulate.ps1]   AUTOMATIONROOT      : C:\automation (default)
[cdEmulate.ps1]   SOLUTIONROOT        : C:\minimal\automation-solution (found C:\minimal\automation-solution\CDAF.solution)
[cdEmulate.ps1]   SOLUTION            : minimal-package (from C:\minimal\automation-solution\CDAF.solution)
[cdEmulate.ps1]   CDAF_DELIVERY       : WINDOWS (derived from domain membership)
[cdEmulate.ps1]   ciProcess           : C:\automation\processor\buildPackage.ps1 (default)
[cdEmulate.ps1]   cdProcess           : .\release.ps1 (default)

[buildPackage.ps1] ============================================
[buildPackage.ps1] Continuous Integration (CI) Process Starting
[buildPackage.ps1] ============================================
[buildPackage.ps1]   BUILDNUMBER     : 773
[buildPackage.ps1]   REVISION        : release
[buildPackage.ps1]   ACTION          :
[buildPackage.ps1]   LOCAL_WORK_DIR  : TasksLocal (default)
[buildPackage.ps1]   REMOTE_WORK_DIR : TasksRemote (default)
[buildPackage.ps1]   AUTOMATIONROOT  : C:\automation (not supplied, derived from invocation)
[buildPackage.ps1]   SOLUTIONROOT    : C:\minimal\automation-solution
[buildPackage.ps1]   SOLUTION        : minimal-package (found $SOLUTIONROOT\CDAF.solution)
[buildPackage.ps1]   BUILDENV        : WINDOWS (derived from domain membership)
[buildPackage.ps1]   WORKSPACE_ROOT  : C:\minimal
[buildPackage.ps1]   hostname        : HP-800-G1
[buildPackage.ps1]   whoami          : vagrant
[buildPackage.ps1]   CDAF Version    : 3.0.0
[buildPackage.ps1]   Pre-build Task  : none (C:\minimal\automation-solution\prebuild.tsk)
[buildPackage.ps1]   Post-build Task : none (C:\minimal\automation-solution\postbuild.tsk)
[buildPackage.ps1]   CM Driver       : none (C:\minimal\automation-solution\*.cm)
[buildPackage.ps1]   PV Driver       : none (C:\minimal\automation-solution\*.pv)

[buildPackage.ps1] Remove Build Process Temporary files and directories

[buildPackage.ps1] CDAF Container Features Set ...
[buildPackage.ps1]   containerBuild            : (not defined in C:\minimal\automation-solution\CDAF.solution)

[06/28/2025 16:27:20] & "C:\automation\buildandpackage\buildProjects.ps1" minimal-package 773 release "C:\automation" "C:\minimal\automation-solution"

[buildProjects.ps1] +----------------------------+
[buildProjects.ps1] | Process BUILD all projects |
[buildProjects.ps1] +----------------------------+
[buildProjects.ps1]   SOLUTION          : minimal-package
[buildProjects.ps1]   BUILDNUMBER       : 773
[buildProjects.ps1]   REVISION          : release
[buildProjects.ps1]   AUTOMATIONROOT    : C:\automation
[buildProjects.ps1]   SOLUTIONROOT      : C:\minimal\automation-solution
[buildProjects.ps1]   ACTION            :
[buildProjects.ps1]   BUILDENV          : WINDOWS
[buildProjects.ps1]   Project list      : none (C:\minimal\automation-solution\buildProjects)

[buildProjects.ps1] Load solution properties ...

[Transform.ps1] PROPFILE  : C:\minimal\automation-solution\CDAF.solution
[Transform.ps1]   productName = Minimal Release Package
[Transform.ps1]   solutionName = minimal-package
[Transform.ps1]   artifactPrefix = 0.0
[Transform.ps1]   packageFeatures = minimal
[Transform.ps1]   packageMethod = tarball
[Transform.ps1]   processSequence = localTasks.ps1

[buildProjects.ps1] Clean temp files and folders from workspace
[buildProjects.ps1] Delete .\*.tar.gz

[buildProjects.ps1] No project directories found containing build.ps1 or build.tsk, assuming new solution, continuing ...

[06/28/2025 16:27:20] & "C:\automation\buildandpackage\package.ps1" minimal-package 773 release "C:\automation" "C:\minimal\automation-solution" TasksLocal TasksRemote

[package.ps1] +-----------------+
[package.ps1] | Package Process |
[package.ps1] +-----------------+
[package.ps1]   SOLUTION                   : minimal-package
[package.ps1]   BUILDNUMBER                : 773
[package.ps1]   REVISION                   : release
[package.ps1]   AUTOMATIONROOT             : C:\automation
[package.ps1]   SOLUTIONROOT               : C:\minimal\automation-solution
[package.ps1]   LOCAL_WORK_DIR             : TasksLocal
[package.ps1]   REMOTE_WORK_DIR            : TasksRemote
[package.ps1]   ACTION                     :
[package.ps1]   Prepackage Tasks           : none (C:\minimal\automation-solution\package.tsk)
[package.ps1]   Prepackage Script          : none (.\package.ps1)
[package.ps1]   Postpackage Tasks          : none (C:\minimal\automation-solution\wrap.tsk)
[package.ps1]   Remote Target Directory    : none (C:\minimal\automation-solution\propertiesForRemoteTasks)
[package.ps1]   Container Target Directory : none (C:\minimal\automation-solution\propertiesForContainerTasks)
[package.ps1]   pwd                        : C:\minimal
[package.ps1]   hostname                   : HP-800-G1
[package.ps1]   whoami                     : vagrant
[package.ps1]   CDAF Version               : 3.0.0
[package.ps1]   packageFeatures            : minimal (option minimal)

[package.ps1]   --- Start Package Process ---

[package.ps1] Delete TasksLocal

[package.ps1] Load solution properties from C:\minimal\automation-solution\CDAF.solution

[Transform.ps1] PROPFILE  : C:\minimal\automation-solution\CDAF.solution
[Transform.ps1]   productName = Minimal Release Package
[Transform.ps1]   solutionName = minimal-package
[Transform.ps1]   artifactPrefix = 0.0
[Transform.ps1]   packageFeatures = minimal
[Transform.ps1]   packageMethod = tarball
[Transform.ps1]   processSequence = localTasks.ps1

Created manifest.txt file ...

# Manifest for revision minimal-package
SOLUTION=minimal-package
BUILDNUMBER=773
REVISION=release
productName=Minimal Release Package
solutionName=minimal-package

artifactPrefix=0.0
packageFeatures=minimal
packageMethod=tarball

processSequence=localTasks.ps1

[package.ps1] Always create local working artefacts, even if all tasks are remote
[06/28/2025 16:27:20] & 'C:\automation\buildandpackage\packageLocal.ps1' 'minimal-package' '773' 'release' 'TasksLocal' 'C:\minimal\automation-solution' 'C:\automation'

[packageLocal.ps1] ---------------------------------------------------------------
[packageLocal.ps1]   WORK_DIR_DEFAULT                : TasksLocal
[packageLocal.ps1]   Local Artifact List             : none (C:\minimal\automation-solution\storeForLocal)
[packageLocal.ps1]   Generic Artifact List           : none (C:\minimal\automation-solution\storeFor)
[packageLocal.ps1]   Local Tasks Properties List     : none (C:\minimal\automation-solution\propertiesForLocalTasks)
[packageLocal.ps1]   Generated local properties      : none (propertiesForLocalTasks)
[packageLocal.ps1]   Local Environment Properties    : none (C:\minimal\automation-solution\propertiesForLocalEnvironment)
[packageLocal.ps1]   Local Tasks Encrypted Data      : none (C:\minimal\automation-solution\cryptLocal)
[packageLocal.ps1]   Common Encrypted Data           : none (C:\minimal\automation-solution\crypt)
[packageLocal.ps1]   Local Tasks Custom Scripts      : none (C:\minimal\automation-solution\customLocal)
[packageLocal.ps1]   Common Custom Scripts           : none (C:\minimal\automation-solution\custom)
[packageLocal.ps1]   Remote Tasks Properties List    : none (C:\minimal\automation-solution\propertiesForRemoteTasks)
[packageLocal.ps1]   Generated remote properties     : none (propertiesForRemoteTasks)
[packageLocal.ps1]   Container Tasks Properties List : none (C:\minimal\automation-solution\propertiesForContainerTasks)
[packageLocal.ps1]   Generated Container properties  : none (propertiesForContainerTasks)

[packageLocal.ps1] Create TasksLocal and seed with solution files
[packageLocal.ps1]   .\manifest.txt --> TasksLocal
[packageLocal.ps1]   C:\automation\CDAF.windows --> TasksLocal\CDAF.properties
[packageLocal.ps1]   C:\automation\processor\delivery.bat --> TasksLocal
[packageLocal.ps1]   C:\automation\processor\delivery.ps1 --> TasksLocal

[packageLocal.ps1] packageFeatures = minimal
[packageLocal.ps1]   C:\automation\remote\getProperty.ps1 --> TasksLocal
[packageLocal.ps1]   C:\automation\local\localTasks.ps1 --> TasksLocal
[packageLocal.ps1]   C:\automation\local\localTasksTarget.ps1 --> TasksLocal
[packageLocal.ps1]   C:\automation\remote\execute.ps1 --> TasksLocal
[packageLocal.ps1]   C:\automation\remote\Transform.ps1 --> TasksLocal

[packageLocal.ps1] Copy local and remote definitions

[packageLocal.ps1]   No files found for tasksRunLocal.tsk tasksRunRemote.tsk

[packageLocal.ps1] zipLocal property not found in manifest.txt (CDAF.solution), no further action required.

[package.ps1] Remote Properties directory (C:\minimal\automation-solution\propertiesForRemoteTasks) or storeForRemote file do not exist, no action performed for remote task packaging

[package.ps1]   --- Package Complete ---
[buildPackage.ps1] artifactPrefix = minimal-package-0.0.773, generate single file artefact ...
[buildPackage.ps1]   Created C:\minimal\minimal-package-0.0.773
[06/28/2025 16:27:20] Move-Item '.\TasksLocal' '.\minimal-package-0.0.773'
[06/28/2025 16:27:20] cd minimal-package-0.0.773
[06/28/2025 16:27:20] tar -czf ../minimal-package-0.0.773.tar.gz .
[06/28/2025 16:27:21] cd ..
[buildPackage.ps1]   Create single script artefact release.ps1
[06/28/2025 16:27:21] Created release.ps1, MB : 0.0172100067138672

[buildPackage.ps1] Clean Workspace...
[buildPackage.ps1] Delete manifest.txt
[buildPackage.ps1] Delete minimal-package-0.0.773.tar.gz
[buildPackage.ps1] Delete minimal-package-0.0.773

[buildPackage.ps1][06/28/2025 16:27:21] Process complete, artefacts [release.ps1] placed in C:\minimal
cdEmulate.bat executes the CI process above, and then automatically starts the default deploy process, WINDOWS for domain joined machines, or WORKGROUP for those that are not.
Minimal build will produce a single build output, release.sh.
[cdEmulate.sh] --------------------
[cdEmulate.sh] Initialise Emulation
[cdEmulate.sh] --------------------
[cdEmulate.sh]   ACTION         : (not supplied, options cionly, buildonly, packageonly or cdonly)
[cdEmulate.sh]   BUILDNUMBER    : 104
[cdEmulate.sh]   REVISION       : release
[cdEmulate.sh]   AUTOMATIONROOT : /automation (derived from invocation)
[cdEmulate.sh]   SOLUTIONROOT   : /minimal/automation-solution (CDAF.solution found)
[cdEmulate.sh]   SOLUTION       : minimal-package (from CDAF.solution)
[cdEmulate.sh]   CDAF_DELIVERY  : LINUX (default)
[cdEmulate.sh]   ciProcess      : /automation/processor/buildPackage.sh (default)
[cdEmulate.sh]   cdProcess      : ./release.sh (due to artifactPrefix being set in /minimal/automation-solution/CDAF.solution)

[buildPackage.sh] ============================================
[buildPackage.sh] Continuous Integration (CI) Process Starting
[buildPackage.sh] ============================================
[buildPackage.sh]   BUILDNUMBER     : 104
[buildPackage.sh]   REVISION        : release
[buildPackage.sh]   ACTION          :
[buildPackage.sh]   LOCAL_WORK_DIR  : TasksLocal (default)
[buildPackage.sh]   REMOTE_WORK_DIR : TasksRemote (default)
[buildPackage.sh]   AUTOMATIONROOT  : /automation
[buildPackage.sh]   SOLUTIONROOT    : /minimal/automation-solution
[buildPackage.sh]   SOLUTION        : minimal-package (from CDAF.solution)
[buildPackage.sh]   BUILDENV        : LINUX (default)
[buildPackage.sh]   WORKSPACE_ROOT  : /minimal
[buildPackage.sh]   hostname        : HP-800-G1
[buildPackage.sh]   whoami          : vagrant
[buildPackage.sh]   CDAF Version    : 3.0.0
[buildPackage.sh]   Pre-build Task  : none (/minimal/automation-solution/prebuild.tsk)
[buildPackage.sh]   Post-build Task : none (/minimal/automation-solution/postbuild.tsk)
[buildPackage.sh]   CM Driver       : none (/minimal/automation-solution/*.cm)
[buildPackage.sh]   PV Driver       : none (/minimal/automation-solution/*.pv)

[buildPackage.sh] Remove Build Process Temporary files and directories

[buildProjects.sh] +----------------------------+
[buildProjects.sh] | Process BUILD all projects |
[buildProjects.sh] +----------------------------+

[buildProjects.sh]   SOLUTION       : minimal-package
[buildProjects.sh]   BUILDNUMBER    : 104
[buildProjects.sh]   REVISION       : release
[buildProjects.sh]   ACTION         : (not passed)
[buildProjects.sh]   BUILDENV       : LINUX
[buildProjects.sh]   AUTOMATIONROOT : /automation (global variable)
[buildProjects.sh]   SOLUTIONROOT   : /minimal/automation-solution (global variable)

[buildProjects.sh] Load properties from /minimal/automation-solution/CDAF.solution
  export  productName='Minimal Release Package'
  export  solutionName='minimal-package'
  export  artifactPrefix='0.0'
  export  packageFeatures='minimal'
  export  processSequence='localTasks.sh'
/automation/buildandpackage/buildProjects.sh: line 105: warning: command substitution: ignored null byte in input

[buildProjects.sh] No projects found, no build action attempted.

[package.sh] +-----------------+
[package.sh] | Package Process |
[package.sh] +-----------------+
[package.sh]   SOLUTION                 : minimal-package
[package.sh]   BUILDNUMBER              : 104
[package.sh]   REVISION                 : release
[package.sh]   LOCAL_WORK_DIR           : TasksLocal
[package.sh]   REMOTE_WORK_DIR          : TasksRemote
[package.sh]   ACTION                   :
[package.sh]   AUTOMATIONROOT           : /automation
[package.sh]   SOLUTIONROOT             : /minimal/automation-solution
[package.sh]   Pre-package Tasks        : none (/minimal/automation-solution/package.tsk)
[package.sh]   Post-package Tasks       : none (/minimal/automation-solution/wrap.tsk)
[package.sh]   Remote Target Directory  : none (/minimal/automation-solution/propertiesForRemoteTasks)
[package.sh]   remote artifact list     : none (/minimal/automation-solution/storeForRemote)
[package.sh]   Remote Target Directory  : none (/minimal/automation-solution/propertiesForContainerTasks)
[package.sh]   generic artifact list    : none (/minimal/automation-solution/storeFor)
[package.sh]   pwd                      : /minimal
[package.sh]   hostname                 : HP-800-G1
[package.sh]   whoami                   : vagrant
[package.sh]   CDAF Version             : 3.0.0
[package.sh]   packageFeatures          : minimal (option minimal)

[package.sh] Clean root workspace (/minimal)

[package.sh] Remove working directories

[package.sh] CDAF.solution file found in directory "/minimal/automation-solution", load solution properties

  productName='Minimal Release Package'
  solutionName='minimal-package'
  artifactPrefix='0.0'
  packageFeatures='minimal'
  processSequence='localTasks.sh'

[package.sh] Created manifest.txt file ...

  # Manifest for revision minimal-package
  SOLUTION=minimal-package
  BUILDNUMBER=104
  REVISION=release
  productName=Minimal Release Package
  solutionName=minimal-package

  artifactPrefix=0.0
  packageFeatures=minimal

  processSequence=localTasks.sh

[package.sh] Always create local artefacts, even if all tasks are remote

[packageLocal.sh] --- PACKAGE locally executed scripts and artefacts ---

[packageLocal.sh]   WORK_DIR_DEFAULT               : TasksLocal
[packageLocal.sh]   local artifact list            : none (/minimal/automation-solution/storeForLocal)
[packageLocal.sh]   Properties for local tasks     : none (/minimal/automation-solution/propertiesForLocalTasks)
[packageLocal.sh]   Generated local properties     : none (./propertiesForLocalTasks)
[packageLocal.sh]   local encrypted files          : none (/minimal/automation-solution/cryptLocal)
[packageLocal.sh]   common encrypted files         : none (/minimal/automation-solution/crypt)
[packageLocal.sh]   custom scripts                 : none (/minimal/automation-solution/custom)
[packageLocal.sh]   local custom scripts           : none (/minimal/automation-solution/customLocal)
[packageLocal.sh]   Properties for remote tasks    : none (/minimal/automation-solution/propertiesForRemoteTasks)
[packageLocal.sh]   Generated remote properties    : none (./propertiesForRemoteTasks)
[packageLocal.sh]   Properties for container tasks : none (/minimal/automation-solution/propertiesForContainerTasks)
[packageLocal.sh]   Generated container properties : none (./propertiesForContainerTasks)

[packageLocal.sh] Create TasksLocal and seed with solution files

mkdir: created directory 'TasksLocal'
'manifest.txt' -> 'TasksLocal/manifest.txt'
'/automation/CDAF.linux' -> 'TasksLocal/CDAF.properties'

[packageLocal.sh] packageFeatures = minimal
'/automation/remote/getProperty.sh' -> 'TasksLocal/getProperty.sh'
'/automation/local/localTasks.sh' -> 'TasksLocal/localTasks.sh'
'/automation/remote/execute.sh' -> 'TasksLocal/execute.sh'
'/automation/remote/transform.sh' -> 'TasksLocal/transform.sh'

'/automation/processor/delivery.sh' -> 'TasksLocal/delivery.sh'

[packageLocal.sh] Copy local and remote definitions

No files found for tasksRunLocal.tsk tasksRunRemote.tsk

[packageLocal.sh] zipLocal not set in CDAF.solution of any build property, no additional action.

[package.sh] --- Solution Packaging Complete ---

[buildPackage.sh] artifactPrefix = minimal-package-0.0.104, generate single file artefact ...
[buildPackage.sh][1] tar -czf minimal-package-0.0.104.tar.gz TasksLocal/
[buildPackage.sh][INFO]
[buildPackage.sh]   Create single script artefact release.sh
[buildPackage.sh]   Set resulting package file executable
[buildPackage.sh] chmod +x release.sh

[buildPackage.sh] Clean Workspace...
rm -rf TasksLocal
rm -rf propertiesForLocalTasks
rm './minimal-package-0.0.104.tar.gz'
rm -rf propertiesForLocalTasks
rm -f manifest.txt

[buildPackage.sh] Continuous Integration (CI) Finished, use ./release.sh <env> to perform deployment.
cdEmulate.sh executes the CI process above, and then automatically starts the default deploy process, WSL for Windows Subsystem for Linux, or LINUX for others.
All previous releases are available for download from https://cdaf.io/static/app/downloads/LU-CDAF-<version>.tar.gz or https://cdaf.io/static/app/downloads/LU-CDAF-<version>.zip for Linux, and https://cdaf.io/static/app/downloads/WU-CDAF-<version>.zip for Windows.
3.0.1 : 19-Mar-2026 : Docker debug option
Reduce the logging verbosity, with option to reinstate original level if desired using environment variable CDAF_LOG_LEVEL.
bootstrap scripts for gitlab and vsts have been deprecated in GitHub, with corresponding installRunner and installAgent provisioning scripts
support for PROPLD reveal and resolve for values containing ; character (Windows)
3.0.0 : 28-Jun-2025 : Core CDAF Release
Breaking change for any solutions dependent on the inclusion of the CDAF provisioning helpers. These now need to be downloaded and run, or downloaded and executed directly in memory, from GitHub.
Move provisioning to GitHub, for Windows and Linux
Move sample solution to GitHub, for Windows and Linux
Remove upgrade scripts, use installer/upgrade from GitHub, for Windows and Linux
Allow zip creation (remote packaging) to be optional
Apply automation root detection to all components
Add support for “invoke” in task driver
0.8.4 : 22-Oct-2015
Add support for Elastic Bamboo images
Allow a variable to be set in Windows, compatible to linux
0.8.3 : 20-Oct-2015
Admin Command shortcut missing Target
Alter CD Emulator build number to be symantic compliant
0.8.2 : 23-Aug-2015
Add Support for post package tasks
0.8.1 : 8-May-2015
Prepackage loadProperties function fails
0.8.0 : 7-May-2015
Provide cdEmulate component execution flexibility
Include deploy task override property in log
Remove unused build.bat from CDAF
CopyLand.ps1 throws an OutOfMemory exception for moderate-to-large package files
Remove redistribution of 7zip executable (windows)
Redeployment Not Renaming Existing Package
LU-CDM fails when no properties files exist
Remove 7za.exe path reference in storeArtifacts.ps1
0.7.4 : 23-Mar-2015
Generate CDAF Release using Jenkins Pipeline
Support URI for Remote PowerShell
0.7.3 : 13-Mar-2015
Apply CD to TFS 2010
Win Form Thick Client
Blank line in StoreFor files causes package to fail
0.7.2 : 4-Mar-2015
Optional PrePackage Process
0.7.1 : 4-Mar-2015
Provide example task files utilising features of CDAF 0.7
0.7.0 : 3-Mar-2015
Linux - Improve Manual Trigger
Windows - Improve Manual Trigger
CDAF branding
Optional Decoupling of User Defined solution
0.6.6 : 27-Feb-2015
Provided coded properties loader in execute function
0.6.5 : 26-Feb-2015
Add optional TaskFile property support for Windows (WU-CDM)
Add optional TaskFile property support for Linux (LU-CDM)
Add ‘development progress’ argument to build scripts
buildTag definition file - windows
buildTag definition file - linux
Error in log output of cdEmulate.bat
Error when defaulting ENVIRONMENT variable in build.bat
Move Zip file creation out of packageCopyArtefacts.ps1
0.6.4 : 25-Feb-2015
Linux - Include artefact “flatting” on copy
0.6.3 : 23-Feb-2015
Project being passed to build script instead of Solution
0.6.2 : 19-Feb-2015
Apply argument driven Database script path
Linear Deploy
Add build.tsk support to Windows (WU-CDM)
Add argument validation to windows entry (BAT)
0.5.7 : 19-Dec-2014
Upgrade Selenium Server to 2.42.2
Provide message for empty artefacts to check for line feed
Add message to check for DOS carriage return when artefact processing fails
Change Artefact packaging to support wildcard and path
List Available Parameters for Remote Tasks template
Allow support for on domain and off domain Remote Exection
Add Encrypted Password support
Principles
CDAF Principles
These articles provide the experiences and learnings which lead to creation of the Continuous Delivery Automation Framework (CDAF). Also included are articles to clarify terminology used, and provides context between these and CDAF.
As mentioned in the Continuous Delivery Automation Framework (CDAF) introduction, this is one of the founding principles…
Loose Coupling : Designed for workstation implementation first, with no tight coupling to any given automation tool-set
Lowest Common Denominator : Using the minimum of the tool-chain plugins & capabilities, to ensure loose coupling
Package Portability : Package Task execution designed for automated push / pull or manual deployment
While this approach protects the pipeline from degradation due to plugin issues, and allows the author to control behaviour, e.g. logging, retry, it is fundamentally important from an ownership, portability and reusability perspective.
Shift-Left & Failing Fast
Shift-left is the principle of bringing solution aspects closer to the developer, as the cost of failing early is exponentially less costly than failing in production. While this discipline is commonly associated with software development, it should be considered a fundamental objective for all aspects of the solution, including infrastructure and configuration management.
Consistent Ways of Working
Infrastructure, Application and Testing automation should follow the same patterns of delivery. By doing so, a full, tested, solution can be delivered repeatably and predictably.
Contributor Ownership
By constructing and testing the automation locally, the contributor can ensure it is healthy prior to committing to source control and executing in the pipeline. The more features that are performed within the automation itself, and the less dependency on any given pipeline, reduces the friction of changing vendor should that be required or desired. See the do nothing pipeline for an elaboration on automation health.
Reusable Asset
By creating Infrastructure, Application and Testing automation output that is portable and autonomous, it can be used for not only the pipeline deployment, but for local execution, allowing the creation of production-like environments at will. See the feedback loop realisation for a detailed example, based on the feedback loop approach.
Do Nothing Pipeline
To embed automation into the feature development lifecycle, a pipeline should exist at the earliest possible time, configured to initially “do nothing” at deploy time.
Enough to make it run
A key principle of the Continuous Delivery Automation Framework (CDAF) is loose coupling. The intention is that the same automation that will be performed by the pipeline, can be developed and tested on the local workstation. Once the minimum automation is available, then the pipeline should be created.
Do-Nothing Pipeline
Ensure the pipeline runs successfully through all stages, e.g. if you have, test, staging and production stages, execute a do-nothing process in each to ensure the basic wiring of your pipeline is sound.
Fail Successfully
Intentionally push a change which causes the pipeline to fail, to ensure contributors can be confident that the pipeline is not giving false positives.
A do nothing pipeline ensures an automation-first approach, with early detection of build failures, however, this can be taken further. Making your first deployed environment Production!
Typically pipelines deploy to the development or test environments first, and eventually progress to production; discovering issues later in the software development lifecycle (SDCL). To realise a fail-fast approach, deploy nothing to production first. By nothing, the absolute bare minimum is the objective, typically something that displays the build number. This allows test teams to verify they are working with the correct build, and importantly, proving the delivery pipeline immediately.
The production environment can be scaled down as the proving ground for the solution architecture. Only when concurrency is required in your SDLC, should non-production environments be instantiated, based on your production environment, ideally via automation. See release train for an elaboration of how to combine automation of infrastructure, configuration management and software delivery.
Realising the Feedback Loop
Continuous Delivery to Shift-Left
While the DevOps Feedback-Loop, along with finding issues early by moving production-like environments closer to the developer (Shift-Left), are key principles, there is commonly no tangible way of achieving this.
In the typically incremental progression of continuous delivery implementations, eventually automation is built to deliver to production, and typically, that is where the story ends.
Before describing the realisation of the feedback loop, it’s important to highlight the underlying framework approaches that make this possible, which are:
Release Portability : the output of the build (Continuous Integration) process is a single, self-contained, deployable artefact
Loose Coupling : delivery orchestration does not use any proprietary mechanisms to deploy, the pipeline tool simply calls the deployable artefact
Artefact Registry : a store of immutable artefacts, not code (repository). These are strictly versioned and ideally offer the ability to download the latest version.
In my Sprint Zero approach, I espouse the creation of an end-to-end, do-nothing pipeline before any development begins. The final stage of this pipeline should be to push the deployable artefact to the Artefact Registry.
By doing this, a known production state is available as feedback to the developers and testers, by getting the latest version from the Artefact Registry.
Consistent Ways of Working
If this approach is applied consistently between your infrastructure, configuration management and software developers, an automated view of the Production environment is automatically available, without having to inspect the current state of each contributing pipeline.
By combining these deployable assets, users have the ability to create a full-stack, production-like environment on demand. This could be wrapped in a graphical user interface or simply run from the command-line.
Artefact Registries
Each registry vendor has different names for general purpose stores, in Azure DevOps it’s called Universal, in GitLab it’s called Generic and in Nexus it’s called Raw.
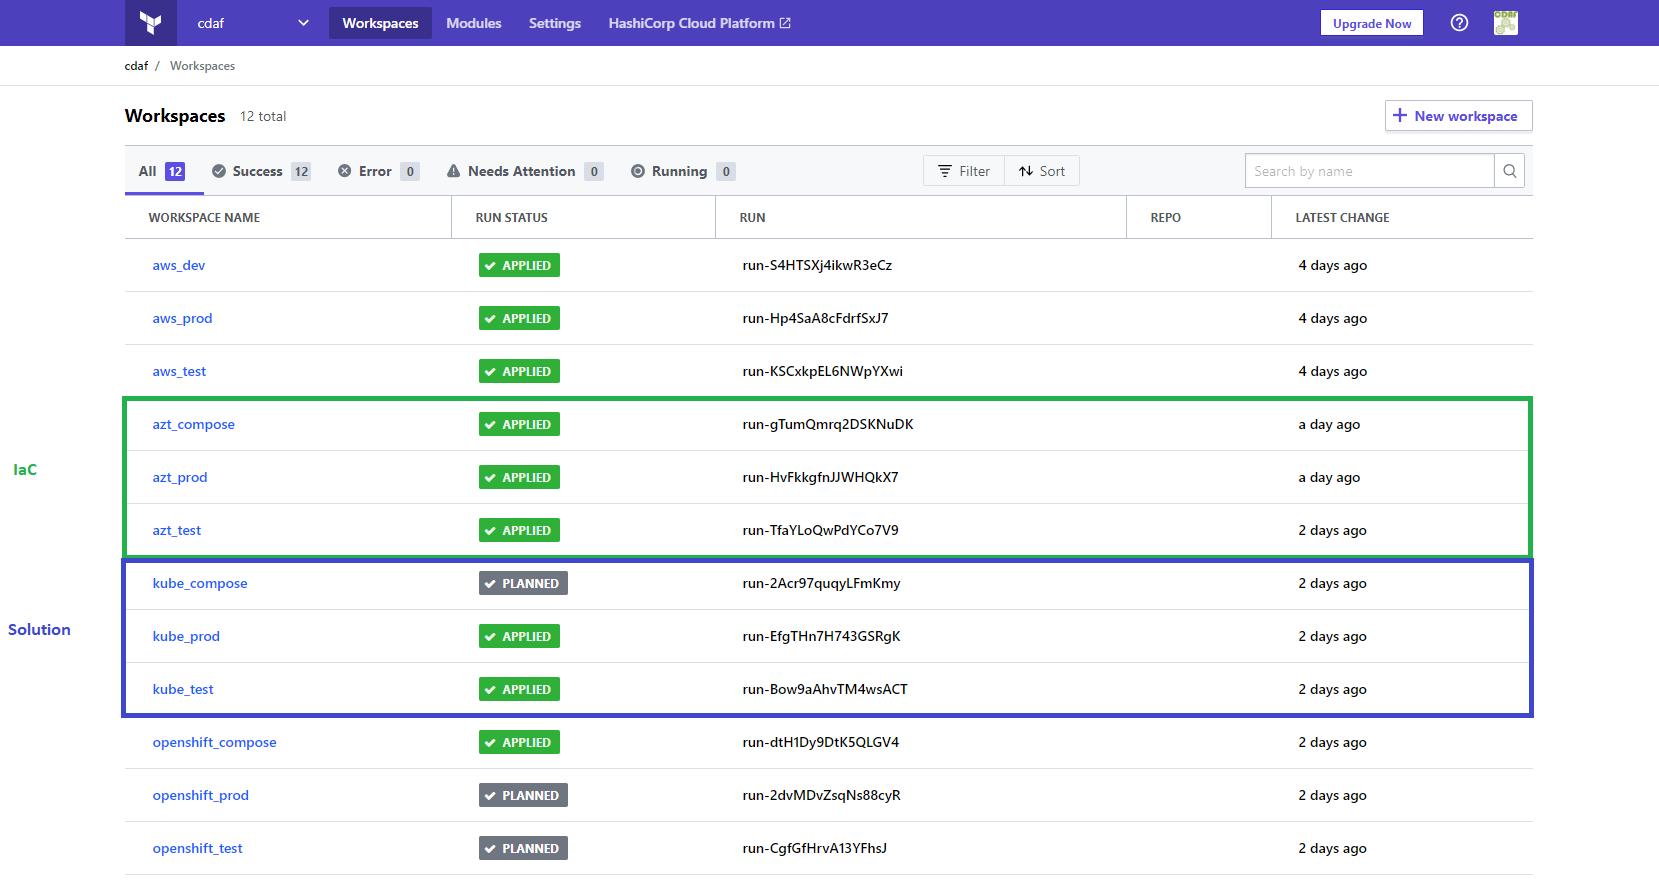
Closing note: in the above example provided, there is an Infrastructure-as-Code (IaC)/configuration management deployment package (AZT) and software deployment package (KAT). The software deployment package is a manifest driven, desired state, deployment of containers, the container image publication is not captured in the artefact store as the image build pipeline does not reflect any target environment state.
For detailed example the creation and usage of the release artefacts in this article see Terraform Cloud Release Train.
Development & Release
DevOps is not a role or product, it’s a principle. With competing desires, i.e. autonomous vs. authoritative, Development and Operations can have different perspectives and these tools can help provide a viewpoint for operations, driven from a “source of truth”.
Development Pipelines
When speaking of Continuous Integration and Continuous Deployment (CI/CD), the conversations are typically developer centric. However, in enterprise environments, Continuous Delivery is more likely the reality, and it is desirable to be able to deliver a release without the involvement of the feature developers, as there may be many different teams contributing to the solution. Orchestrating these individuals for a release deployment can be a scheduling challenge and distracts those teams from their core purpose.
To gather these distributed concerns, it is common to try and apply processes, procedures, governance and standardisation at the development level, which is an Agile anti-pattern. So to provide developer freedom with the release predictability required, these two concerns are divided in autonomy and authority.
Autonomous Development
The key difference from developer centric approaches is that the development teams do not deploy to user environments, instead the end of the development delivery pipeline results in pushing an immutable image to the registry. The development teams can use whatever source control and branch strategy they choose, e.g. Git Flow, Simple Branch Plans, Feature Branches, etc. In this example the development team are using GitHub Actions to build (Docker), test (docker-compose) and publish their component, see Containers at Scale, A Containers Journey.
The published image may not the build image, but it must be the production ready (optimised and hardened) image which was verified in the test process.
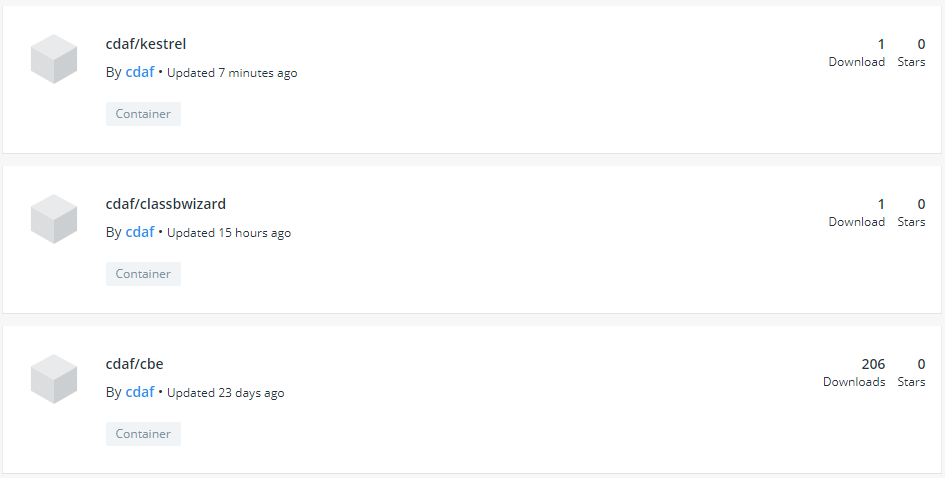
Each component or micro service is delivered to the central catalogue, in this example, Docker Hub, but this could be any Open Container Initiative (OCI) Registry, either public or private.
Delivery Pipelines
With the Container Registry being the nexus of the autonomous development teams, now the release definition at a solution level can be declared. This codifies the release, whereas a manual release may involve spreadsheets and workbook documents, the implementation of the release is abstracted by the automation tool, in this case Terraform.
Infrastructure as Code (IaC)
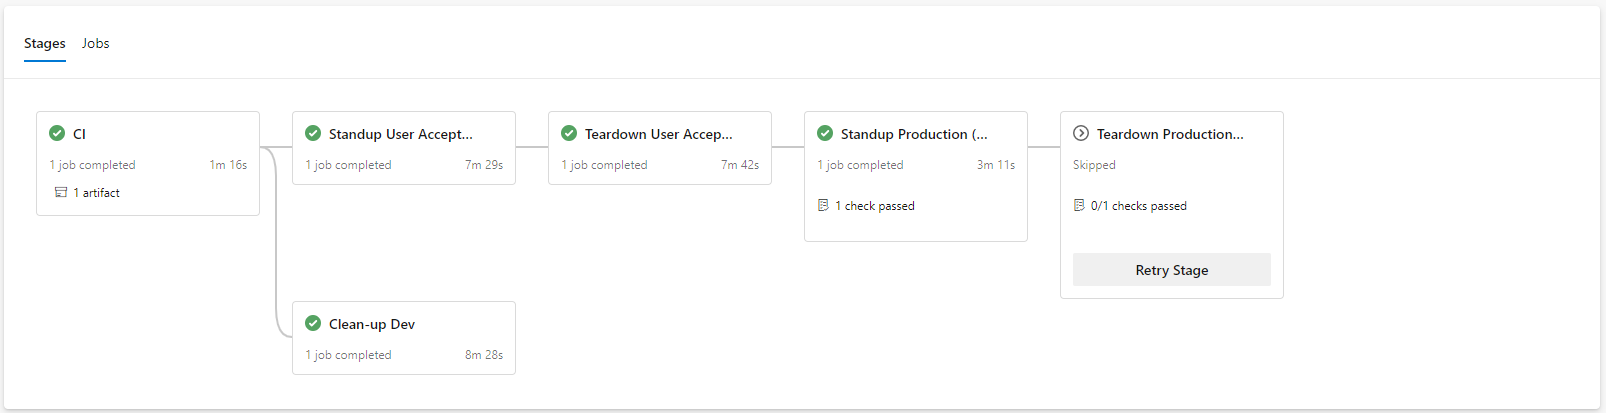
This is the common use case of Terraform. In this example, the delivery of the Kubernetes platform is executed from an Azure DevOps pipeline using a 12-Factor approach, with feature branch development. Releases to production are only based on master and implemented with gating. When a feature is complete and the pull request (PR) processed, the environment created for the feature branch is destroyed (“clean-up Dev”).
Authoritative Deployment
While Terraform is considered an infrastructure tool, what it actually is, is a flexible, declarative desired state engine. So while it can be utilised to deliver and manage a Kubernetes platform in Azure, it can also be used to deploy applications to the resulting Kubernetes platform. The components are declared as a desired state and applied via the solution pipeline, which may deploy one or more images from the development teams. In this example, the solution deployment development is performed using feature branches and pull requests.
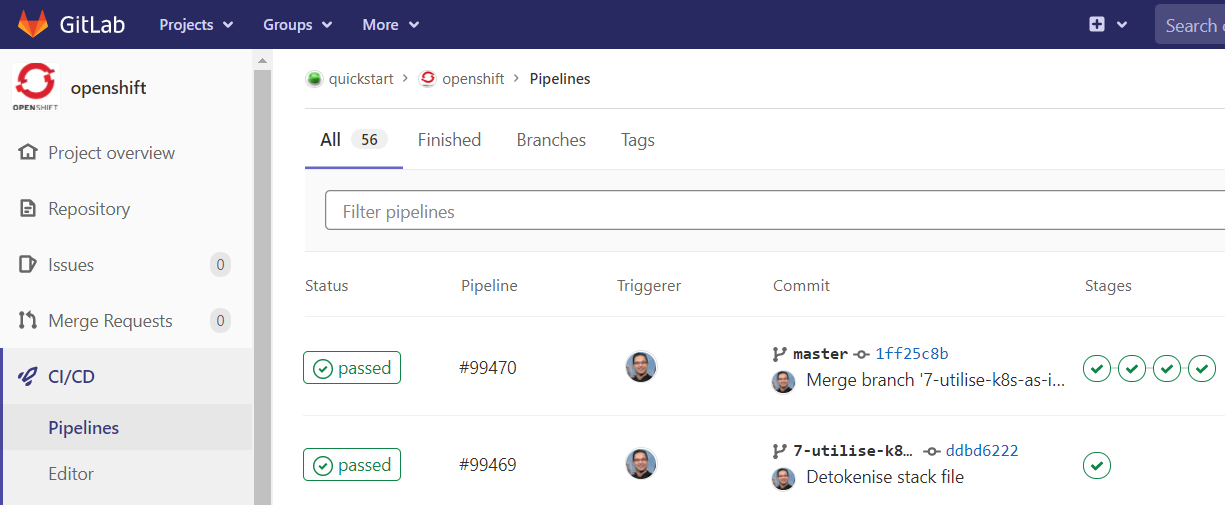
In this example, the solution delivery is executed from a, GitLab Pipeline with approval gates.
Viewpoints
Each of the viewpoints above are development oriented, so where is the operations pane-of-glass? This is where the intermediary adds value. All solutions in Terraform require a persistent store for state. There are many choices from the default local file system, to public cloud, however the Terraform Cloud offering provides the following advantages:
persistent storage independent of any provider, e.g. to use AWS you need to create an S3 bucket, which is infrastructure, which you should do via code, but the code would then need an S3 bucket, therein lies a paradox
SaaS offering, no maintenance required
Execution visibility, regardless of source
The last advantage provides the operational visibility. All of the delivery pipelines send their requests, be it IaC or solution via the Terraform Cloud, therefore a complete view of all executions, regardless of pipeline, are visible to the operations team.
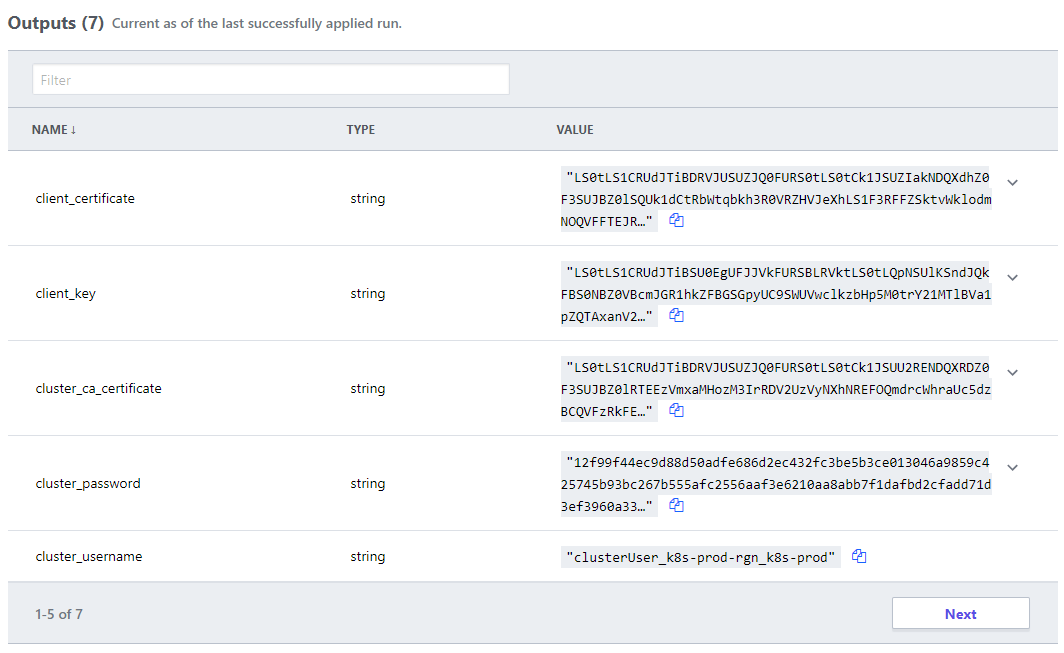
Secret management for all solution are combined into the Terraform SaaS, satisfying any separation of duty requirements, and any dynamically generated attributes that the development team would need to handover to operations is defined as code, and available to authenticated users.
Conclusion
Exploit your available tools to provide separation of concerns while providing transparency.
Don’t let governance stifle creativity, while ensuring freedom doesn’t lead to anarchy.
Plan for scale and complexity, “we’ll automate that later” commonly leads to “automation never”, after all the building is only as sound as it’s foundations.
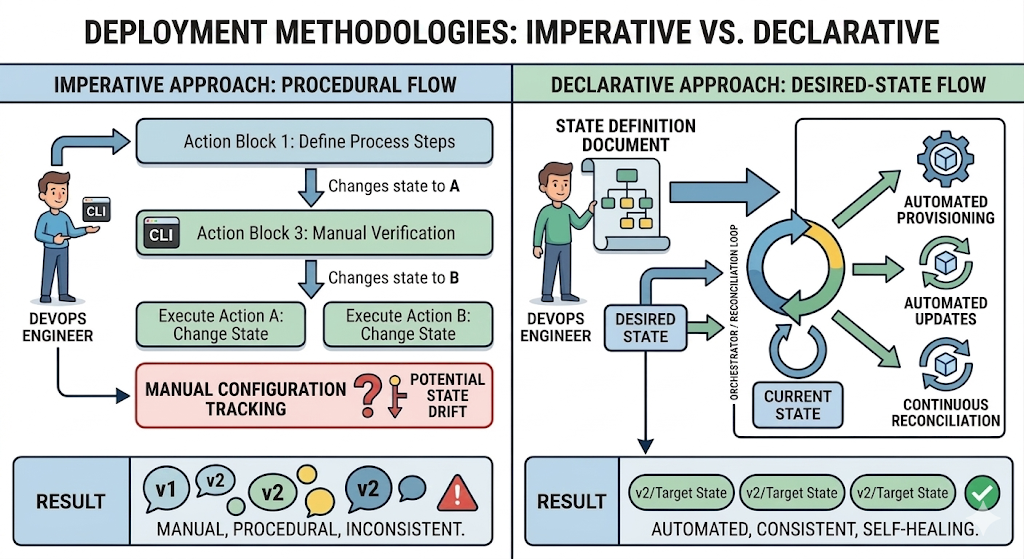
Imperative Deployment vs. Declarative Desired State
Imperative (Procedural Flow): Focuses on the manual execution of a specific sequence of commands, requiring the operator to manage state transitions directly, which increases complexity and the risk of configuration drift.
Declarative (Desired-State Flow): Uses an automated orchestrator (a reconciliation loop) that continuously compares the actual system state with a predefined state definition document. It handles provisioning and updates automatically to ensure consistent, self-healing environments.
In a very simple ecosystem, an imperative approach to deployments can be effective. For each target environment, the component promotion (the staging from Test to Production for example) can be timed by the DevOps engineer to ensure the combination of components that were tested are consistent with those that go live.
Drift, When things go wrong…
In this example, due to an oversight, the user interface was promoted to Production without the correct API version. The user interface fails in production even though it worked in test as expected, and a critical dependent API operation is now not available due to a drift.
Backend
Frontend
To add more complications, there is another version of the user interface in test now. What version of the API does it require?
This approach is not scalable, where an ecosystem has many components, and many environments, the complexity grows exponentially and the chances of manual errors leading to inconsistency increase.
There are two distinct and important concepts to cover, Declarative & Desired State.
Declarative
Declarative is a style of implementation where you describe what you want to achieve, rather than how to achieve it. In a declarative approach, you specify the desired outcome or state of the system, and the underlying implementation takes care of the details.
Desired State
Desired State refers to the specific configuration or condition that you want a system to be in. It represents the target state that you want to achieve, and it is often used in the context of infrastructure management, configuration management, and orchestration.
Orchestrated Deployment
Orchestrated Deployment is a process of managing and automating the deployment of applications and services in a way that ensures they are deployed in the desired state. It involves coordinating various components and resources to achieve the desired outcome, often using tools and frameworks that support declarative configurations.
In an orchestrated deployment, you would typically define the desired state of your application, such as the number of replicas, resource requirements, and network configurations. The orchestration tool would then take care of deploying the application according to the specified desired state, ensuring that it is running and functioning as intended.
In summary, a declarative approach focuses on describing the desired state of the system, while an orchestrated deployment is a method of achieving that desired state through automation and coordination of resources.
What does it actually look like?
There are a variety of declarative notations:
For virtual machine machines there are Chef, Salt, Puppet, Ansible, etc. and for Windows Desired State Configuration (DSC) or Active Directory Group Policies.
For containers there are Kubernetes, Docker Compose, and HashiCorp Nomad. For serverless there are AWS CloudFormation, Azure Resource Manager, and Google Cloud Deployment Manager.
For public cloud infrastructure and a broad range open-source and commercial production, Terraform has become the pseudo-standard.
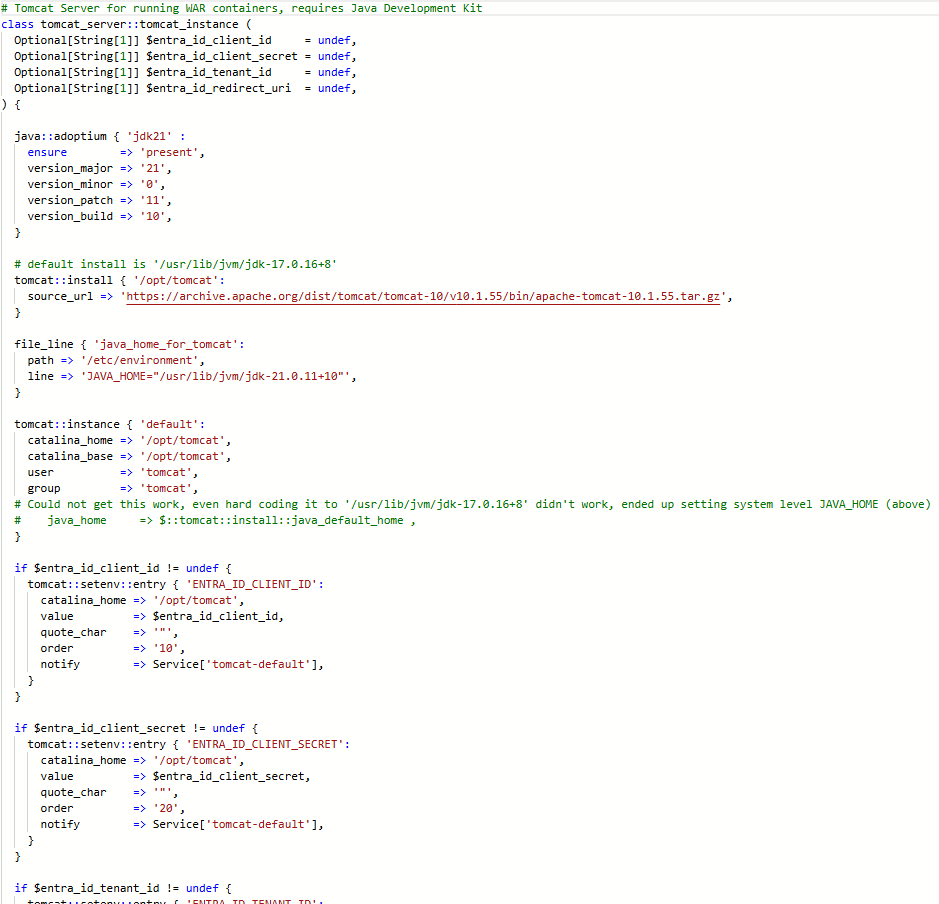
This example is Puppet applying environment variables to a Tomcat server.
Declaration
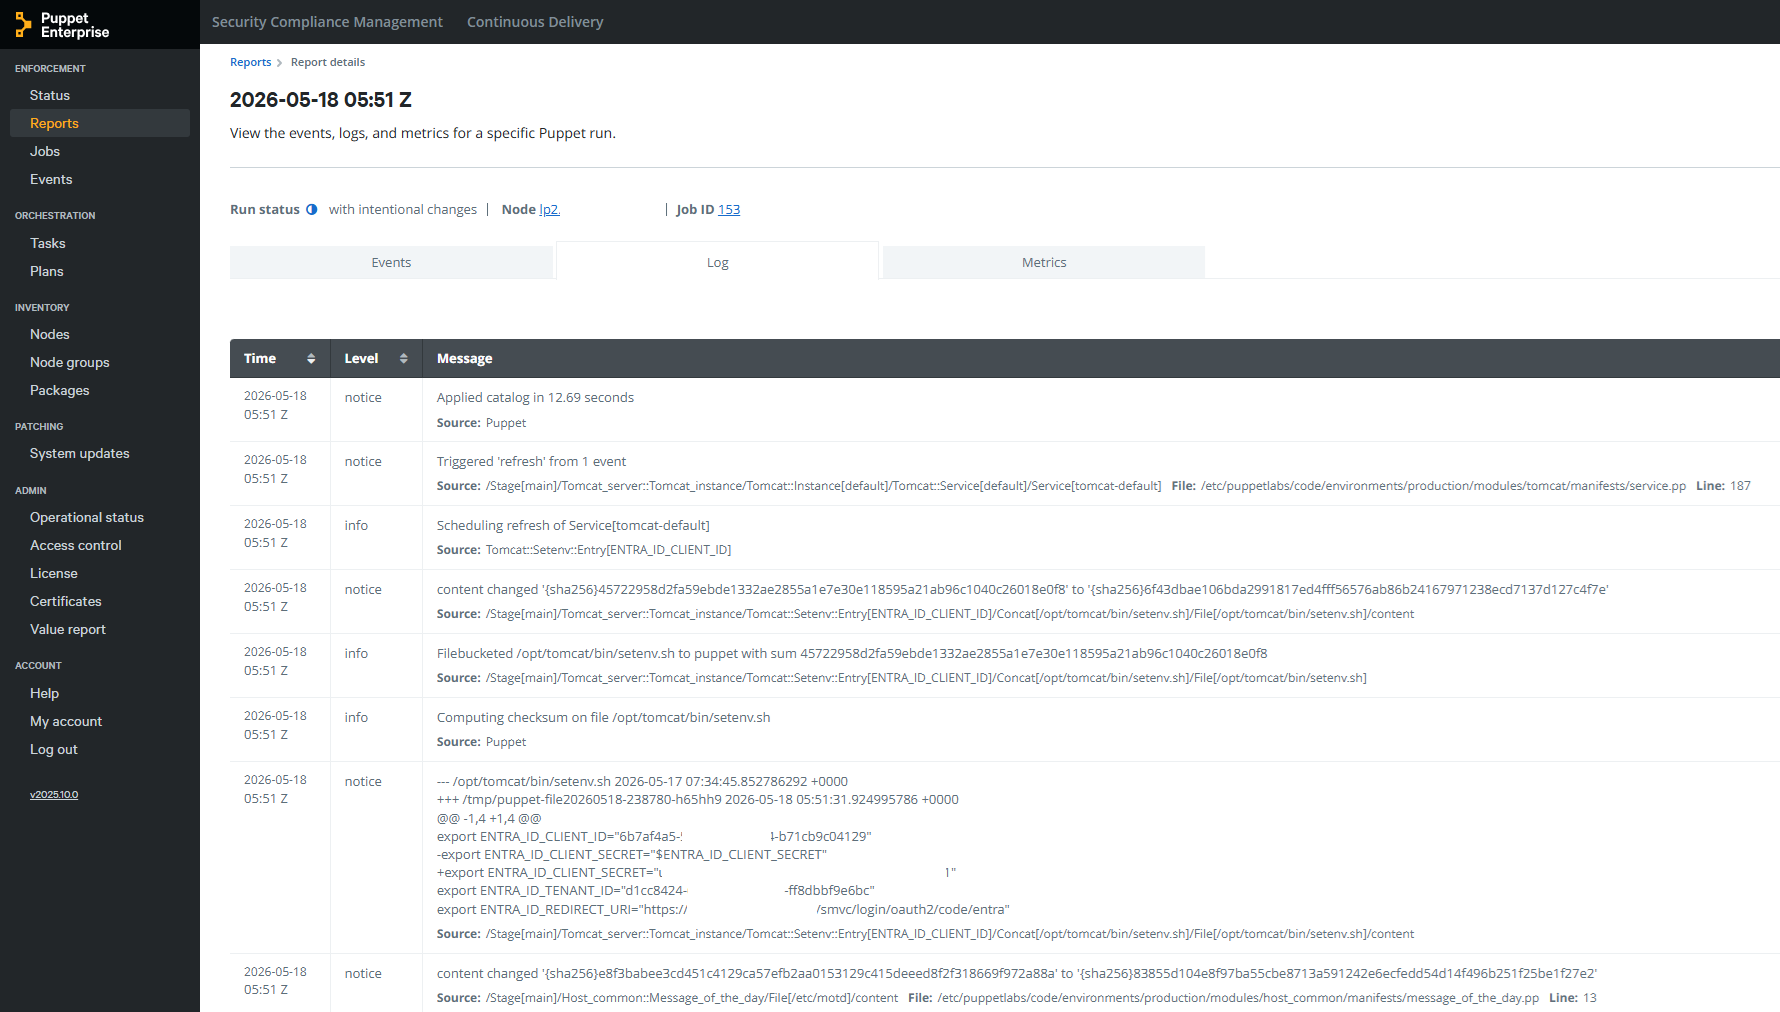
Application of Desired State
Implementation Patterns with CDAF Declarative Release for implementation examples, which incorporate intermediary tools such Ansible Tower, Puppet Enterprise and Terraform Cloud
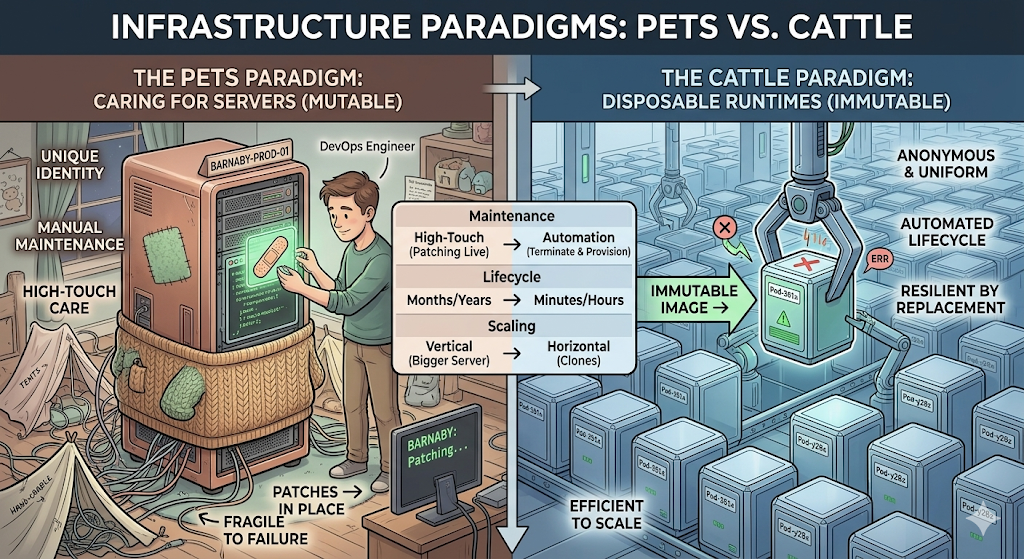
In a traditional infrastructure model, servers are treated like domesticated pets. They are given unique names, carefully nurtured, and kept alive at all costs.
Individual Identification: Every server has a distinct identity (e.g., prod-oracle-db-02 or billing-app-srv). Engineers know exactly what runs on which machine.
Mutable State: Software updates, security patches, and configuration tweaks are applied directly to the live, running server over time.
High-Touch Maintenance: When a server acts up, an engineer logs in via SSH to diagnose the issue, read local logs, and manually repair it.
The Cost of Failure: Because the server is unique, its downtime is an operational emergency. If it dies, rebuilding it exactly as it was can take hours or days, often leading to data loss or “configuration drift” (where no one is entirely sure how the server was originally configured).
Disposable Runtimes (The “Cattle” Paradigm)
In modern cloud-native architectures, infrastructure is treated like cattle or disposable machinery. Runtimes—such as Docker containers, micro-VMs, or serverless functions—are completely anonymous, identical, and easily replaced.
Anonymity & Uniformity: Runtimes do not have individual names; they have auto-generated IDs (e.g., srv-pod-x89f2). Every instance in a cluster is a perfect clone of the other.
Immutable Infrastructure: You never modify a running container or runtime. If you need to update an application or patch an OS vulnerability, you build a new container image and swap the old ones out.
Automated Lifecycle: Runtimes are designed to be ephemeral. They are spun up when traffic spikes and instantly torn down when demand drops. They might live for only a few minutes or hours.
The Cost of Failure: Disposability transforms failure into a non-event. If a container exhibits an error, becomes unresponsive, or runs out of memory, the orchestrator (like Kubernetes) immediately terminates it and provisions a brand-new, healthy replica in seconds.
Branch Plans
Alternate Branch Strategies
Different branch plans do not explicitly define deployment approaches, however, there are common associative methods for each plan, which are described in the subsequent pages. This page provides the baseline terminology that will be used in the remainder of this material.
Trunk Based
Commonly referred to as Trunk Based Development. This is the simplest strategy and is commonly synonymous with Continuous Delivery (more on this to come). The only long running branch is main.
Simple Branch Plans
This branch strategy has been promoted by Microsoft, and is fundamental in their deploy process within Visual Studio. with two (or sometimes more) long-lived branches, e.g. main being used for test and release being used for production. Each additional environment requires another branch.
GitFlow
Originating from distributed source control systems, with prolonged disconnection. The majority of source control tools provided now are centralised server solutions, which obfuscate the underlying distributed architecture. GitFlow has continued, while being adjusted to use Pull Request/Merge Request to merge between branches. This typically has many long-lived branches, e.g. main, develop, release, hot-fix.
Continuous Delivery (CD) decouples the release activity from development activity. Unlike Continuous Deployment, Continuous Delivery has one or more approval gates. At time of writing, the majority of pipeline tools support approval gates, with the exception of the GitHub Free tier.
The Continuous Delivery Maturity Model
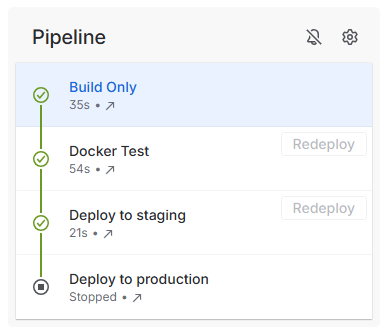
A fundamental aspect of Continuous Delivery is to build once and deploy many times. This means the output of the development process (Continuous Integration) is an artefact which can be re-used to deploy to multiple environments. The artefact represents the Release. Once this artefact is produced, the developer input is complete, and a non-development user, i.e. Test Managed or Product Owner can promote the release through various environments to production.
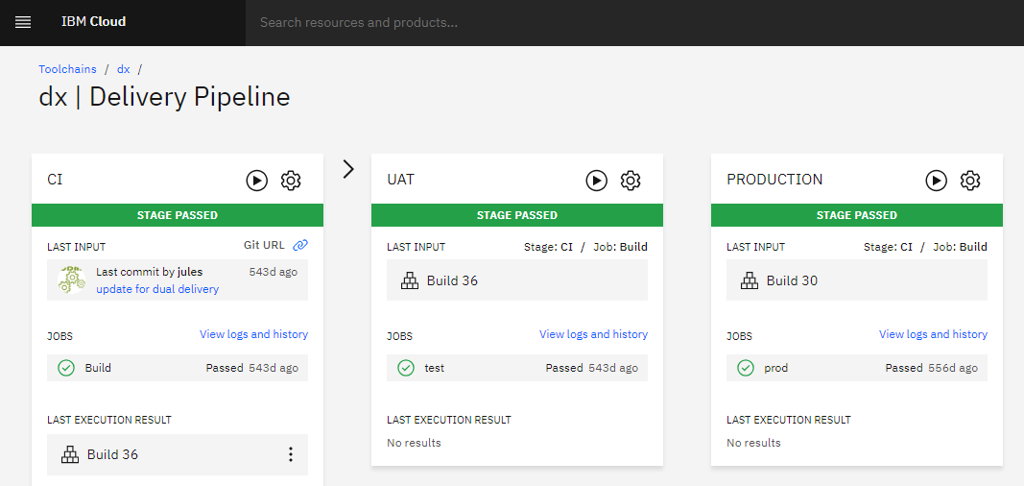
In this example, the first stage is Continuous Integration (CI) which produces the release. Each stage after that is automatically executed, with an integration test stage, and then deployment to the staging environment. After the deployment to staging, the pipeline stop, awaiting approval.
The release artefact in this example is #26, and this is re-used in each deployment phase.
The approval gate advises the approver of what release is currently in production (#23) and what release will be deployed.
Once approved, the same artefact that was tested, is now promoted to Production, completing the pipeline.
Where the pipeline tool does not support approval gating, but a review and approval mechanism is desired, the “Pull Request”/“Merge Request” can be used. The resulting approval will rebuild the solution and deliver it to the defined environment.
Branch Based Deployment
There are a variety of methods used within a branch based deployment approach, the following is a common example.
A long-living branch is defined for each target environment, in this example dev, test and release. A source of truth branch exists (main) which does not trigger a deployment.
Unlike Continuous Delivery, a separate build is created for each environment, e.g. #64 in development, #65 in acceptance test, etc.
The long-lived branches provide a high level of concurrency and flexibility to skip stages, or deploy a selected feature or fix (known as “Cherry-picking”).
To “promote” changes from feature to development, then on to test and production, a pull request is raised for each stage. In this scenario it is typically a fellow developer that reviews and approves the change, and not a business user, i.e. Product Owner.
The merge triggers the corresponding build and deploy for the target branch/environment.
GitOps is another branch based deployment approach, however it typically does not have a Continuous Integration construct, and instead deploys directly from source control.
Branch Based Deployment Directly from Source Control
GitOps is commonly portrayed as Trunk Based
Each target environment maybe defined as a directory, but in many some cases, i.e. to provide a gating mechanism, like Branch Based Deployment, multiple long-lived branches are used.
Release
Release Definitions and Tools
A release can mean different things to different organisations. For product build teams who distribute to many customers, a release is the shippable product made available to consumers, and this is not the context of the following material.
The release process is the final stage of the software delivery pipeline, and is the point at which the software is made available to end-users or customers. The release process can involve several steps, including:
Deployment: The software is deployed to the production environment. This can be done manually or through automated deployment tools.
Testing: The software is tested in the production environment to ensure that it is functioning as expected. This can include smoke testing, performance testing, and user acceptance testing.
Monitoring: The software is monitored for any issues or errors that may arise after release.
Rollback: If any issues are detected, the release process should include a rollback plan to revert to the previous stable version of the software.
Communication: The release process should include communication with stakeholders, such as customers, users, and internal teams, to ensure that everyone is aware of the release and any potential impacts.
The release process is a critical part of the software delivery pipeline, and it is important to have a well-defined and tested release process to ensure that releases are successful and do not cause issues for end-users or customers.
Build Once, Deploy Many
The principle of “build once, deploy many” is a key concept in software delivery and release management. It refers to the practice of building a software application or component once and then deploying that same build to multiple environments, such as development, testing, staging, and production.
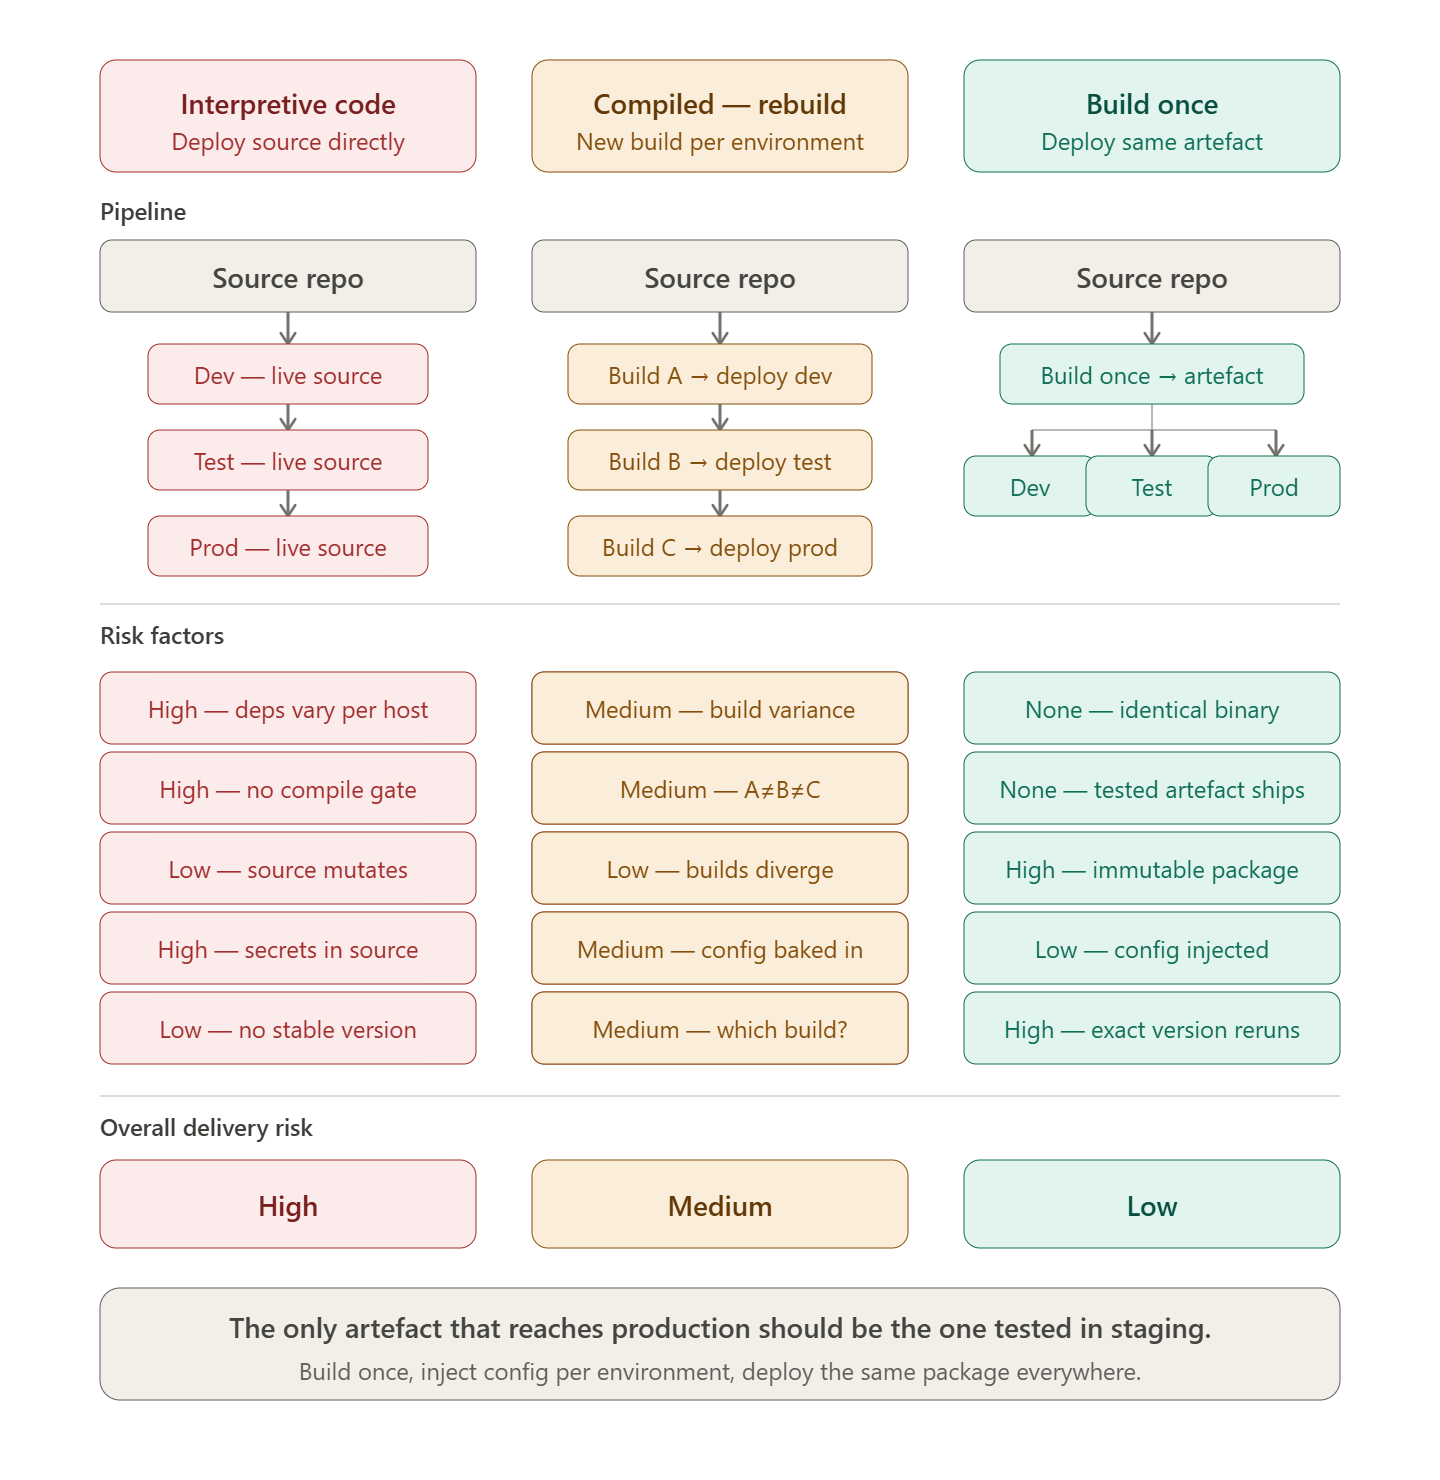
Code is not released
While interpretive languages, e.g. Javascript, Python, etc. can be deployed directly from source control, this approach is not a release. Compiled languages which are recompiled for each environment are also not a release.
The release artefact is the output of the build process, and should be immutable, meaning that it cannot be modified after it has been built. This allows for consistency across all environments, as the same build can be deployed to each environment without any changes. The following tools facilitate the deployment of one or more release packages, independent to the source code that created them.
Octopus Deploy
Octopus Deploy is a dedicated release orchestration and deployment automation tool. It treats the release as a first-class concept: a versioned, immutable snapshot of one or more packages that is promoted through environments rather than rebuilt.
Key characteristics relevant to build-once, deploy-many:
Release promotion: A release is created once from a specific package version and then promoted through environments (dev → test → staging → production) without rebuilding.
Environment-specific variables: Configuration is injected at deploy time via scoped variable sets, keeping secrets and environment differences out of the artefact itself.
Deployment targets: Supports virtual machines, Kubernetes clusters, cloud services, and on-premises infrastructure from a single release definition.
Runbooks: Operational tasks (database migrations, smoke tests, rollback scripts) can be defined alongside deployments and triggered as part of the release pipeline.
Audit and traceability: Every deployment records who approved it, when it ran, what package version was used, and what the outcome was — supporting compliance and rollback decisions.
Octopus separates the concern of building (handled by your CI tool) from releasing (handled by Octopus), which aligns directly with the principle that the artefact tested in staging is the artefact shipped to production.
Azure DevOps Releases
Azure DevOps Releases (part of Azure Pipelines) provides a pipeline-based release orchestration layer that sits downstream of the build pipeline. A release definition consumes build artefacts and controls their progression through a sequence of stages.
Key characteristics relevant to build-once, deploy-many:
Artefact linking: A release is triggered from a pinned build artefact — the same compiled output is carried through every stage without rebuilding.
Stage gates and approvals: Pre- and post-deployment conditions (manual approvals, automated quality gates, scheduled windows) control when promotion to the next environment occurs.
Variable groups and Azure Key Vault integration: Environment-specific configuration is managed through variable groups and secrets stored in Key Vault, injected at deploy time rather than baked into the package.
Deployment strategies: Supports rolling, blue-green, and canary deployment patterns natively, enabling controlled rollout and straightforward rollback to a previous release.
Integration with the Azure ecosystem: Native connectivity to App Service, AKS, Azure Functions, and other Azure targets reduces the configuration overhead for cloud-hosted workloads.
Azure DevOps Releases is particularly well-suited to organisations already invested in the Microsoft toolchain, providing a governed promotion path from a single build artefact across all environments.
Implementation Patterns with CDAF
Declarative Release for implementation examples, which incorporate intermediary tools such Ansible Tower, Puppet Enterprise and Terraform Cloud
Release Trains for implementation examples, which incorporate Octopus Deploy and Azure DevOps Release feature
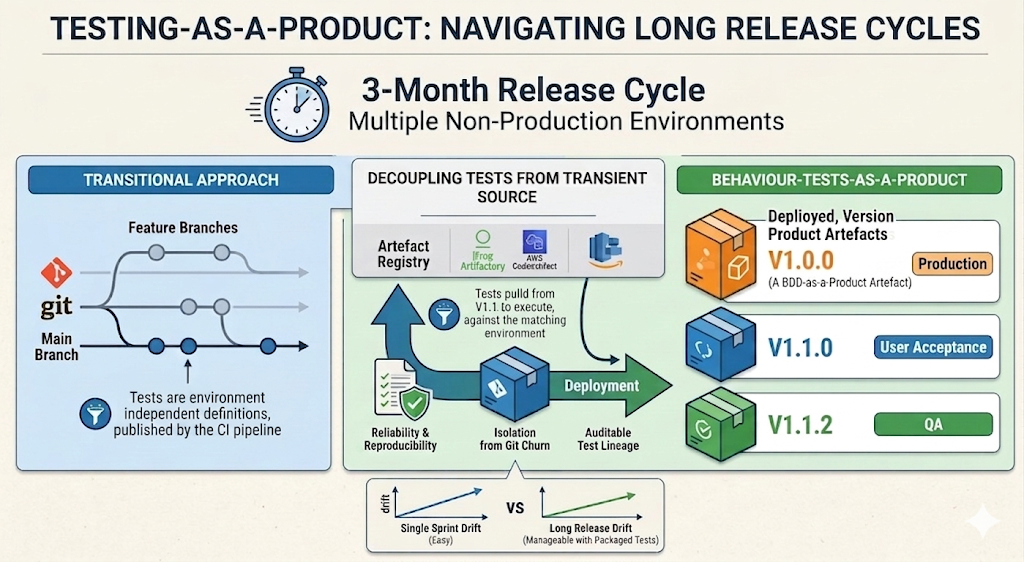
While build-once/deploy-many software releasing is well established, test automation is commonly executed directly from source, sometimes with branches to cover variations. As an alternative, I encourage packaging (versioning) test automation. As a reusable product, tests can be re-run from your artefact registry without exposure to the transient nature of source control.
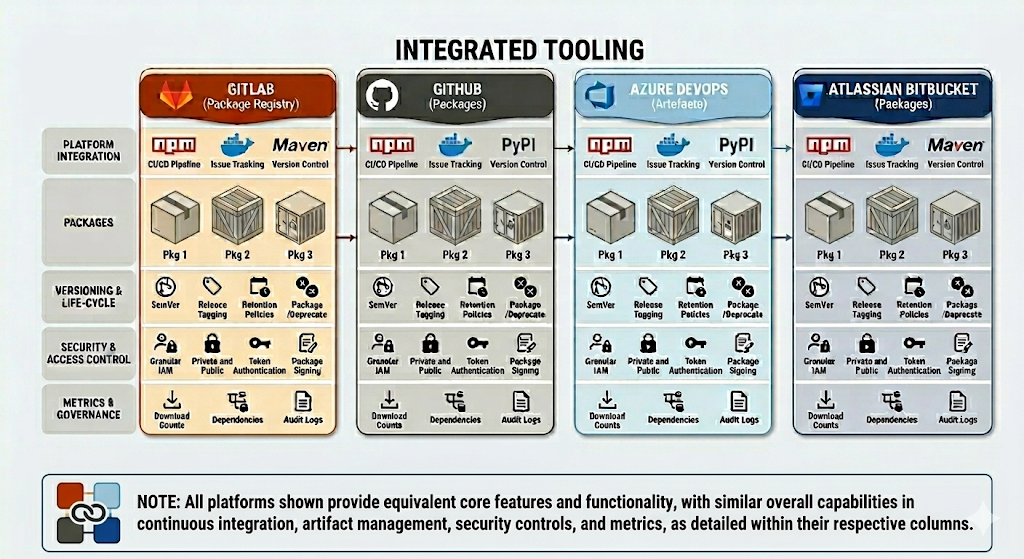
Package Management
A stand alone package registry can be used as described above, or if using an integrated tooling offering, the registry included can be used.
Stability Tests
With the versioned automated test product, the package can not only be consumed within delivery pipelines, it can also be used for scheduled tests, for example nightly tests. While new features and corresponding tests are progressing through the delivery lifecycle, the nightly tests can still consume a known version with confidence.
Implementation Patterns with CDAF
One of the key features of CDAF is that packages are abstracted from the implementation ecosystem, e.g. NodeJS, .NET, Python, etc. and a single, self-extracting script is the output of the CI process. It is this which is published in the registry, and executed by reference to perform automated tests.
Note: if your automated test product is a container image, the release package script will provide a wrapper to execute the container based test and capture the output.
Test Product(s) can be included as part of the component manifests in the following release disciplines.
Declarative Release for implementation examples, which incorporate intermediary tools such Ansible Tower, Puppet Enterprise and Terraform Cloud
Release Trains for implementation examples, which incorporate Octopus Deploy and Azure DevOps Release feature
Imperative Deployment
Autonomous Development Pipelines
These examples are traditional development lifecycles, where each component is built (CI) and deployed (CD) independently. The deployments may or may not be gated, or maybe triggered based on branches, i.e. GitOps.
Build, Package and Deploy with Internet Information Services
This article matures the material authored by Troy Hunt, You’re deploying it wrong! In his article, the simple branch plan method was prevalent, as prescribed by Microsoft. This article lays the implementation foundations for trunk based delivery.
The key principle for trunk based delivery is build-once, deploy-many. The following steps achieve this using the Continuous Delivery Automation Framework (CDAF). The legacy features of Azure DevOps are used in this example.
In this example, the ASP.NET solution creates a Web Deploy package. A common approach for this is to create a build for each environment with the settings transformed into environment specific .config files.
In the CDAF approach, a single, tokenised, configuration file, i.e. Web.Release.config is produced. The principle of a single way of working encourages the abstraction of application settings from the internal representation.
Note: The Release build is used in this example, to avoid breaking the development experience which typically uses the Debug configuration. IF the developers use both Debug & Release configurations, create a separate configuration because the tokenised Release will not run in Visual Studio.
For generic settings, a simple direct mapping is recommended
The construction of web deploy settings for the deploy path is not intuitive and is no longer (after 2010) accessible via the Visual Studio user interface. Edit the .csproj file directly for the Release property group.
note that the % character itself has to be encoded, i.e. %25
Now that the ASP.NET specific files have been prepared, now the Continuous Integration (CI) process can be applied which will Build & Package the solution.
The primary driver file for CDAF is the CDAF.solution file. The directory containing this file is the SOLUTIONROOT. The mandatory properties are solutionName and artifactPrefix.
solutionName=MyAspAppartifactPrefix=0.1
Build Process
The CDAF Execution Engine is used to reduce the cognitive load, allowing the engineer to focus on the primary objective, and not have to cater for logging, exception and error handling. The build.tsk file is placed in the project sub-directory.
build.tsk
The EXITIF operation allows the skipping of the build prcess if the built-in variable $ACTION has been set to clean. The MSTOOL operation loads the path to MSBuild.exe into environment variable $env:MS_BUILD. The REPLAC operation detokenises static content file to inject the product version, which includes the built in $BUILDNUMBER. Then the compile of the code and generation of Web Deploy (/T:Package) artefacts is performed:
REMOVE bin
REMOVE obj
Write-Host "If Action is clean only, then exit`n"EXITIF $ACTION -eq"clean"Write-Host "Combine to create symantic (http://semver.org/) version`n"ASSIGN $productVersion+='.'ASSIGN $productVersion+=$BUILDNUMBER
MSTOOL
Write-Host "PROJECT : $($PROJECT)"Write-Host "`$productVersion : $productVersion`n"Write-Host "[$PROJECT] Apply product version as static content`n"REPLAC Views\Shared\_Layout.cshtml %productVersion% $productVersion
Write-Host "[$PROJECT] Build Project ($PROJECT) with specific parameters for web deploy.`n"& "$env:MS_BUILD" $PROJECT.csproj /T:Package /P:Configuration=Release /p:buildNumber=$productVersion
The resulting build is a directory files, which need to be included in your storeFor definition for packaging
storeFor
Define the artefacts that are needed to perform repeatable deployments.
The CDAF CI process will build the application, with tokenised settings and package this into a self-extracting release.ps1 file. This release package can be executed for all target environments.
The tokenised configuration files need to be detokenised at deploy time. The settings are likely to include both sensitive and non-sensitive values. A core principle of CDAF for sensitive values is based on the 12-Factor approach of using environment variables, while source control is the recommended approach for non-sensitive values.
Why Source Control for Settings?
The Continuous Delivery Automation Framework (CDAF) has been engineered for enterprise scale implementations. Large scale organisations typically have a higher focus on gating and auditing, and to provide a change of configuration audit trail, along with a single way-of-working, the configuration changes are applied using the same principles as other deliveries, e.g application development.
How are Application Settings Defined?
From the CI process, the release package containers a dokenised SetParameters.xml So now configuration management can be applied at deploy time. To provide a separation of concerns, where a user only wants to compare or change settings for environments, they do not have to understand the ASP.NET specific XML file formats, instead, they only need to review the configuration management tables.
properties.cm
CDAF does not have an opinionated view of configuration management files, but by convention, the key configuration settings are placed in properties.cm in the SOLUTIONROOT. The field names in the configuration management file must match the tokens.
context  target  webAppSite           webAppName  sqlDBHost  sqlDBName  sqlDBUser  sqlDBPassword
local    TEST    "Default Web Site"   test        nonprod    test       testuser   $env:TEST_DB_PASS
local    TEST    "Default Web Site"   uat         nonprod    uat        uatuser    $env:UAT_DB_PASS
local    PROD    "Default Web Site"   prod        prodsql    prod       produser   $env:PROD_DB_PASS
Deploy Many
During (Local)[/10-cdaf/10-getting-started/60-local-tasks] or (Remote)[/10-cdaf/10-getting-started/70-remote-tasks] deployment. The deployment task can now detokenise all properties for the application deployment. The CDAF Execution Engine is used to perform the deploy time detokenisation. CDAF environment variables are used to manipulate behaviour.
Write-Host "Detokenise the non-sensitive settings for this environment"DETOKN MyAspApp.SetParameters.xml
Write-Host "Detokenise the sensitive settings, resolving, but not revealing, settings containing variable names"$env:CDAF_OVERRIDE_TOKEN = '@'DETOKN MyAspApp.SetParameters.xml $TARGET resolve
Write-Host "Use Web Deploy to deploy the Aware application".\MyAspApp.deploy.cmd /Y /M:localhost
The overview of how to construct and test this locally see the CDAF basics.
Java and Maven Example
Build, Package and Deploy with Tomcat
This article lays the implementation foundations for Release Train delivery. The key principle is Autonomous Development, Authoritative Release, with this material describing an autonomous development pipeline. The following steps achieve this using the Continuous Delivery Automation Framework (CDAF).
To provide a runtime verification of the build that has been deployed, the version is automatically incremented by placing a variable in the pom.xml file
<?xml version="1.0" encoding="UTF-8"?> ..
<artifactId>springboot</artifactId><groupId>io.cdaf</groupId><name>Spring Boot Data REST Sample</name><description>Spring Boot Data REST Sample</description><version>0.2.${build.number}</version>
In the build task, the build number is supplied as a maven parameter
The resulting artefact is in a subdirectory, buy using the -flat parameter in storeForLocal the artefact will be placed in the root of release package.
springboot/target/springboot.war -flat
Image Build
By setting the buildImage property in the CDAF.solution driver file, a docker image build and push is triggered. In this example the image is pushed to an on-premise container registry (Nexus).
While this example does not delivery the software component imperatively, i.e. it is release declaratively via the Release Train, a Continuous Delivery stage is still performed, however this is a closed loop process, where docker-compose is used to stand-up a container instance from the image, stand-up another container to perform a smoke test, and then tear down the stack.
In this example, a React App, with Typescript, is built and package, then deployed to a Content Delivery Network. As there is no server side component to configure for environment differences, an alternate strategy is used.
As the application is static content, runtime variables are not applicable, however, variations in the application configuration at deploy time can, on occasions, be applicable, e.g. using a different Google Tag Manager (GTM) for production and non-production environments to ensure the analytics are not contaminated.
Within source control there are two tokens applied. The first is a build-time token, which captures the semantic version. This is constructed from a release prefix and build number. This ensure from a user/tester perspective, the running asset can be verified to build that created it.
The second token is the GTM ID, this is deploy-time token.
<!DOCTYPE html><htmllang="en"><head><!-- Google Tag Manager --><script>(function(w,d,s,l,i){w[l]=w[l]||[];w[l].push({'gtm.start':
new Date().getTime(),event:'gtm.js'});var f=d.getElementsByTagName(s)[0],
j=d.createElement(s),dl=l!='dataLayer'?'&l='+l:'';j.async=true;j.src=
'https://www.googletagmanager.com/gtm.js?id='+i+dl;f.parentNode.insertBefore(j,f);
})(window,document,'script','dataLayer','@gtm-id@');</script><!-- End Google Tag Manager -->
The primary driver file for CDAF is the CDAF.solution file. The directory containing this file is the SOLUTIONROOT. The mandatory properties are solutionName and artifactPrefix.
solutionName=classbwizardproductName=React Class B Recreational Vehicle Comparison ToolartifactPrefix=0.5
Build Process
The CDAF Execution Engine is used to reduce the cognitive load, allowing the engineer to focus on the primary objective, and not have to cater for logging, exception and error handling. In this example, the build.tsk file is not placed in the project sub-directory, instead this is placed in the solution root. The reason for this is that the project sub-directory is copied to a temporary directory for the build, because the source code is manipulated prior to the build and it this should not be mistakenly committed to source control.
Note the construction of semver, combined from source control major & minor version, with build number suffix to ensure version is unique and traceable.
The continuous delivery has multiple phases, first is a closed-loop test, then are the runtime environments, which are promoted, starting with acceptance test.
Closed-Loop Test
This first delivery stage used docker-compose to stand-up, test and tear-down an environment. This environment is transient and not accessible by manual testers.
After the closed-loop tests have passed, then the deployment to user acceptance test is performed. In source control, the configuration management table defines the target environments and their GTM ID.
The GTM ID publicly accessible in the static content, and therefore does not need to be managed as a secret, i.e. can be plain text in source control.
context  target  deployTaskOverride       github_repo             gtm_id
local    TEST    push-static-content.tsk  classb-test.opennz.org  G-JM71HCEG2Q
local    PROD    push-static-content.tsk  classb.opennz.org       GTM-5VSBHSV
At deploy-time the GTM ID for the target environment is detonised in the static content before pushing it to the content delivery network CDN.
The release includes both the build-time and deploy-time detokenised content.
Declarative Release
Declarative Desired State Application Release
Previous deployment examples, from a release perspective, are imperative. For example, should a solution combine changes in both front-end (React) and back-end (NodeJS), each deployment would need to be coordinated manually to perform a Release.
Based on the Autonomous Development, Authoritative Release approach, instead of each application component deploying separately, they produce a deployable asset, and the solution is released authoritatively. The Autonomous Development pipeline outputs an immutable, versioned, environment agnostic, deployable asset. For example, an image in a Container Registry, a WAR/JAR file in Nexus/Artifactory, or a versioned zip file in a generic package store (Azure DevOps, GitLab, GitHub, etc.). This approach is based on the build once, deploy many Continuous Delivery Maturity Model.
The need to deploy these components based on the declaration is the responsibliilty of the desired state engine. the following examples are covered in this section:
Creating an artefact for compiled languages is well understood, and is an integral part of software delivery for languages such as .NET, Java and Typescript, however, for interpretive languages (Python, Ruby, PHP, Javascript), because the code in source control can be run without a “build”, it is tempting to deploy from source control. This has the following challenges:
Fulfilling dependencies in production environment, can have network issues and, even with lock files, can result is different runtime outcomes.
Manual steps are required as branches are used to separate environments, e.g. test, staging, production. Which requires deploy-time developer effort and can lead to errors, i.e. untested code being merged into production.
Package & Publish
Resolving dependencies at build time, adding any other runtime components and creating an immutable package for deployment can be achieved using the CDAF technology-agnostic package mechanism. The “build” artefact completes the development team’s Continuous Integration (CI) stage.
The Continuous Delivery (CD) would be limited to automated testing of the package, and then publication. Publication can be to a Container Registry, Package Registry (Nexus, Artifactory, Azure DevOps, GitLab, GitHub, etc.) or a proprietary asset registry such as Octopus Deploy or Mulesoft AnyPoint Exchange. The following example uses a Container Registry.
The following overview has two examples, one using the CDAF release package with automated testing, and one performing direct image build and push.
pip resolves Python dependencies, and gathers these, along with helper scripts, to produce a release package. The release package is then used to construct a runtime image, which in turn is smoke tested using docker-compose. The tested image is then pushed to the registry.
NPM resolves NodeJS dependencies, builds an image and pushes it to the registry.
graph LR

  subgraph python["Python"]
    python-git[(Git)]
    python-build-artefact[(Build)]
    python-release.ps1
    subgraph docker-compose
      image-container
      test-container
    end
    push
  end

  subgraph node["NodeJS"]
    node-git[(Git)]
    node-build
    node-push["push"]
  end

  registry[(Docker Registry)]

  python-git -- "CI (pip)" -->
  python-build-artefact -- "CD" -->
  python-release.ps1 -->
  image-container -->
  push --> registry
  test-container -. "smoke test" .-> image-container

  node-git -- "CI (NPM)" -->
  node-build -->
  node-push --> registry

classDef dashed stroke-dasharray: 5, 5
class python,node dashed

classDef dotted stroke-dasharray: 2, 2
class docker-compose dotted

classDef blue fill:#007FFF
class registry blue
Note: the Python release.ps1 is an intermediary artefact, and not used to deploy to the runtime environments.
A declarative deployment ensures all components are Released in a predictable way, with the assurance the same combination of component versions that were tested align with what is released.
Release Manifest
The release contains a manifest of components and their version. This is the release declaration. The deployment is responsible for ensuring these components are applied at as declared at each promotion stage, e.g. test, staging, production. In the flow below, the release is continuously deployed through to staging, but continuously deployed, i.e. gated, to production.
For each deployment, the same image is used to create the running container.
flowchart LR
  registry[(Docker Registry)]

  subgraph test
    p1["Python v0.2.135"] ~~~
    n1["NodeJS v1.0.3"]
  end

  subgraph staging
    p2["Python v0.2.135"] ~~~
    n2["NodeJS v1.0.3"]
  end

  subgraph production
    p3["Python v0.2.135"] ~~~
    n3["NodeJS v1.0.3"]
  end

  test -- "auto promote" --> staging
  staging -- "gated promote" --> production

  registry --> test
  registry --> staging
  registry --> production

classDef blue fill:#007FFF
class registry blue
For context see Behaviour Tests as a Product. The development of test automation is autonomous and is not tightly coupled with the solution development. When the solution is ready to execute a set of tests, the versioned package is obtained and executed.
Environment Definitions
Configuration Management within the source allows for test execution by simply invoking the test package for the desired environment, e.g. ./package.ps1 PROD, or targeted testing ./package.ps1 PROD_WEB
context  target      testSuite       featureSet  resources                                 secrets
local    PROD_CLASS  SpecFlow.Specs  data        supabase                                  creds_prd
local    PROD_WEB_1  Selenium.Specs  login       https://example.com/Calculator.html       vault_prd
local    PROD_WEB_2  Selenium.Specs  dashboard   https://example.com/Calculator.html

local    TEST_CLASS  SpecFlow.Specs  data        supabase                                  creds_tst
local    PROD_WEB_1  Selenium.Specs  login       https://test.example.com/Calculator.html  vault_tst
local    PROD_WEB_2  Selenium.Specs  dashboard   https://test.example.com/Calculator.html
The delivery phase of the pipeline pushes the package to a registry, with a semantic version. It is these versions that the solution delivery process can consume to provide predictable test results.
graph LR

  subgraph Component A
    Rbuild["Build"] -->
    Rtest["Test"] -->
    Rpublish["Publish</br>1.0.1"]
  end
  subgraph Component B
    Pbuild["Build"] -->
    Ptest["Test"] -->
    Ppublish["Publish</br>0.5.9"]
  end
  subgraph Test Product
    Sbuild["Build"] -->
    Stest["Test"] -->
    Spublish["Publish</br>1.2.0"]
  end

  subgraph Release
    TEST:::release
    PROD:::release
  end

  store[(Registry)]

  Rpublish --> store
  Ppublish --> store
  Spublish --> store
  store --> TEST
  TEST --> PROD

classDef release fill:lightgreen
In this example, current production tests are at version 1.1.0. While the next release of 1.2.0 is in progressing through the development lifecycle, the scheduled tests can still consume version 1.1.0 with confidence. The scheduled tests may have a reduced scope, i.e. web only, this is where the ability to select a subset is valuable, e.g. ./package.ps1 PROD_WEB.
How to Helm
Declarative Desired State Container Deployment using Helm
This is an alternative implementation to Terraform Application Stack, using Helm instead of Terraform, but with the same core principles of runtime versioning and desired state.
The Application Stack can be defined once, and deployed many times into separate namespaces, e.g. development, test and production.
graph TD

  subgraph k8s["Kubernetes"]
    subgraph ns1["Dev namespace"]
      ns1-ingress["ingress"]
      subgraph ns1-pod-1["Pod"]
        ns1-con-a["container"]
      end
      subgraph ns1-pod-2["Pod"]
        ns1-con-b["container"]
        ns1-con-c["container"]
      end
    end
    subgraph ns2["Test namespace"]
      ns2-ingress["ingress"]
      subgraph ns2-pod-1["Pod"]
        ns2-con-a["container"]
      end
      subgraph ns2-pod-2["Pod"]
        ns2-con-b["container"]
        ns2-con-c["container"]
      end
    end
    subgraph ns3["Production namespace"]
      ns3-ingress["ingress"]
      subgraph ns3-pod-1["Pod"]
        ns3-con-a["container"]
      end
      subgraph ns3-pod-2["Pod"]
        ns3-con-b["container"]
        ns3-con-c["container"]
      end
    end
  end

  client -->
  ns1-ingress --> ns1-con-a
  ns1-ingress -->
  ns1-con-b --> ns1-con-c

  client -->
  ns2-ingress --> ns2-con-a
  ns2-ingress -->
  ns2-con-b --> ns2-con-c

  client -->
  ns3-ingress --> ns3-con-a
  ns3-ingress -->
  ns3-con-b --> ns3-con-c

classDef external fill:lightblue
class client external

classDef dashed stroke-dasharray: 5, 5
class ns1,ns2,ns3 dashed

classDef dotted stroke-dasharray: 2, 2
class ns1-pod-1,ns1-pod-2,ns2-pod-1,ns2-pod-2,ns3-pod-1,ns3-pod-2 dotted
Kubernetes configuration can be performed via imperative command line or declarative YAML files. While OpenShift provides a user interface to allow manual configuration of the Kubernetes cluster, which is ideal for discovery and development purposes, but is not sustainable in a production solution.
While Kubernetes YAML definitions are declarative, it is laborious have multiple copies for similar deployment patterns and multiple target environments. The most fundamental declaration is a deployment, which defines what containers are to be deployed.
To avoid proliferation of YAML definitions, and provide flexibility to alter deployment specific aspects, Helm was introduced. Helm provides a template for deployments, which can be re-used for multiple applications across multiple environments.
graph TD

    subgraph test
        subgraph app1
        serv1["service"]
        app1-pod["pod"]
        end
        subgraph app2
        serv2["service"]
        app2-pod["pod"]
        end
    end

    subgraph prod
        subgraph app3
        serv3["service"]
        app3-pod["pod"]
        end
        subgraph app4
        serv4["service"]
        app4-pod["pod"]
        end
    end

  serv1 --> app1-pod
  serv2 --> app2-pod

  serv3 --> app3-pod
  serv4 --> app4-pod

classDef dotted stroke-dasharray: 2, 2
class test,prod dotted

classDef dashed stroke-dasharray: 5, 5
class app1,app2,app3,app4 dashed
Deploying each application, in each environment, requires imperative knowledge of what steps are needed to achieve the desired outcome. See Desired State releases, rather than imperative.
The following example is relatively complicated and doesn’t serve well as a learning exercise.
Use the Helm Getting Started material to create a template which has all the appropriate structure and some example charts.
Note
The template does not work in OpenShift because the root-less containers do not allow Nginx to bind to port 80.
How Helm Works
Using the previous YAML example, all of the elements that we want to re-use for multiple apps, or configure differently for progressive environments, are defined as properties. This is the basis of the files that make up the template.
apiVersion: apps/v1kind: Deploymentmetadata:
name: {{ include "Chart.fullname" . }}labels:
{{- include "Chart.labels" . | nindent 4 }}spec:
{{- if not .Values.autoscaling.enabled }}replicas: {{ .Values.replicaCount }} {{- end }}selector:
matchLabels:
{{- include "Chart.labels" . | nindent 6 }}template:
metadata:
labels:
{{- include "Chart.labels" . | nindent 8 }}spec:
containers:
- name: {{ .Chart.Name }}image: "{{ .Values.image.repository }}:{{ .Values.image.tag | default .Chart.AppVersion }}"ports:
- containerPort: {{ .Values.service.port }}
There are two files used with the templates to apply deploy time settings, the Chart.yaml, which is included with the template implements the DRY principle, i.e. Don’t Repeat Yourself. Where literals that are applied repeatedly across the template are defined.
Chart.yaml
apiVersion: v2name: nginx-containerfullname: nginx-deploymentdescription: A Helm chart for KubernetesappVersion: "1.16.0"labels:
app: nginx
A values file is used at deploy time to allow the re-use of the template across multiple applications, and environments.
To avoid the creation of multiple values YAML files, and the inherent structural drift of those files, a single file should be defined with tokenised settings. The CDAF configuration management feature can be used to provide a human readable settings definition which gives an abstraction from the complexity of the Helm files.
example.cm
context    target  replicaCount  port
container  LINUX   1             8081
container  dev     1             8080
container  TEST    2             8001
container  PROD    2             8000
Now the values YAML contains tokens for deploy time replacement.
To provide Helm charts as a re-usable asset, Helm provides versioning and packaging. The resulting versioned packages can be consumed by multiple applications and environments. To ensure the release package is consistent and repeatable, the Helm packages are downloaded at build (CI) and not during deployment (CD). The packages are included in the release package so there are no external dependencies at deploy time.
The Helm registry
Helm command line can create the packaged templates and the required index file.
helm package $chart_name --destination public
helm repo index public
The resulting files and index.yaml files are placed on a web server to provide the repository service, e.g.
apiVersion: v1entries:
internal-service:
- apiVersion: v2appVersion: 1.16.0created: "2022-08-11T08:51:15.763749822Z"description: Use Values for Container Namedigest: 9a0cf4c0989e3921bd9b4d2e982417c3eac04f5863feb0439ad52a9f1d6ffeb9name: internal-servicetype: applicationurls:
- internal-service-0.0.1.tgzversion: 0.0.1kiali-dashboard:
- apiVersion: v2appVersion: 1.16.0created: "2022-08-11T08:51:15.764037805Z"description: Use Values for Container Namedigest: aa65089080e3e04a6560a1f3b70fc8861609d8693c279b10154264a9fe9fc794name: kiali-dashboardtype: applicationurls:
- kiali-dashboard-0.0.2.tgzversion: 0.0.2
To manage an application stack holistically, a Declaration is required. From this declaration, desired state can be calculated, i.e. what changes need to be made for an environment to be aligned to the declaration. The tool used in this example is Helmsman, however, another tool, Helmfile has fundamentally the same configuration constructs. Each gather one or more Helm applications to create an application stack. Only the necessary components will be updated if a change is determined, based on a calculated state change.
graph TD
  subgraph Test
    subgraph stack1["Declaration"]
      subgraph app1["Helmchart"]
        serv1["service"]
        appt1["pod"]
      end
      subgraph app2["Helmchart"]
        serv2["service"]
        appp2["pod"]
      end
    end
  end

  subgraph Prod
   subgraph stack2["Declaration"]
      subgraph app3["Helmchart"]
        serv3["service"]
        appt3["pod"]
      end
      subgraph app4["Helmchart"]
        serv4["service"]
        appp4["pod"]
      end
    end
  end

  serv1 --> appt1
  serv2 --> appp2

  serv3 --> appt3
  serv4 --> appp4

classDef AppStack fill:LightBlue
class stack1,stack2 AppStack

classDef dotted stroke-dasharray: 2, 2
class stack1,stack2 dotted

classDef dashed stroke-dasharray: 5, 5
class app1,app2,app3,app4 dashed
The build-time process uses the declaration to determine the Helm charts that are required at deploy time. These are downloaded and included in the package, this has the advantage of not having to manage registry access at deploy time and ensures the charts are immutable within the release package.
There is no “compiled” output for the source files described above, so the self-contained release package capability of Continuous Delivery Automation Framework (CDAF) is used to produce a portable, re-usable deployment artefact, i.e. build once, deploy many.
graph LR

  subgraph ci["Continuous Integration"]
    persist[(persist)]
  end

  release.ps1

  subgraph cd["Continuous Delivery"]
    test
    prod
  end

  persist -->
  release.ps1 --> test
  release.ps1 --> prod

classDef blue fill:#007FFF
class release.ps1 blue

classDef dashed stroke-dasharray: 5, 5
class ci,cd dashed
The deployment uses an Environment argument is a symbolic link to the settings that need to be detokenised at deploy time, e.g.
This example is the deploy time process for Helmsman, although it is fundamentally the same for Helmfile. The tokenised application stack declaration is de-tokenised to apply the correct name_space at deploy time.
helm.tsk
sed -i -- "s•name_space•*****•g" ranger.yaml
the resulting deployment
helmsman --apply -f ranger.yaml ranger-chart
 _ _
| | | |
| |__ ___| |_ __ ___ ___ _ __ ___ __ _ _ __
| '_ \ / _ \ | '_ ` _ \/ __| '_ ` _ \ / _` | '_ \
| | | | __/ | | | | | \__ \ | | | | | (_| | | | |
|_| |_|\___|_|_| |_| |_|___/_| |_| |_|\__,_|_| |_| version: v3.11.0

Helm-Charts-as-Code tool.
WARNING: helm diff not found, using kubectl diff

INFO: Parsed [[ ranger.yaml ]] successfully and found [ 1 ] apps
INFO: Validating desired state definition
INFO: Setting up kubectl
INFO: Setting up helm
INFO: Setting up namespaces
INFO: Getting chart information
INFO: Chart [ /solution/deploy/ranger-chart ] with version [ 0.1.0 ] was found locally.
INFO: Charts validated.
INFO: Preparing plan
INFO: Acquiring current Helm state from cluster
INFO: Checking if any Helmsman managed releases are no longer tracked by your desired state ...
INFO: No untracked releases found

NOTICE: -------- PLAN starts here --------------
NOTICE: Release [ ranger ] in namespace [ test ] will be installed using version [ 0.1.0 ] -- priority: 0
NOTICE: -------- PLAN ends here --------------

INFO: Executing plan
NOTICE: Install release [ ranger ] version [ 0.1.0 ] in namespace [ test ]
NOTICE: Release "ranger" does not exist. Installing it now.
NAME: ranger
LAST DEPLOYED: Sun Aug 7 03:42:51 2022
NAMESPACE: test
STATUS: deployed
REVISION: 1
NOTES:

1. Get the application URL by running these commands:
 export POD_NAME=$(kubectl get pods --namespace test -l "app.kubernetes.io/name=ranger-chart,app.kubernetes.io/instance=ranger" -o jsonpath="{.items[0].metadata.name}")
 export CONTAINER_PORT=$(kubectl get pod --namespace test $POD_NAME -o jsonpath="{.spec.containers[0].ports[0].containerPort}")
 echo "Visit http://127.0.0.1:8080 to use your application"
 kubectl --namespace test port-forward $POD_NAME 8080:$CONTAINER_PORT

NOTICE: Finished: Install release [ ranger ] version [ 0.1.0 ] in namespace [ test ]
The key to using Helm charts rather than simply authoring Kubernetes YAML definitions is the use of templates. This way a deployment pattern can be defined once, with only the deploy time, application specific, values being changed.
From the Helm template the health probes are hard coded, replace these with shared definitions, .Values.service.port & .Values.service.probeContext.
The .Values.service.port is already defined in the generated values file, but .Values.service.probeContext is not, so add this to the values definition.
values.yaml
service:
type: ClusterIPport: 8000probeContext: /
Now replace single values file with a file for each application being deployed based on this pattern. Create additional app definitions in Helmsman
Some changes cannot be updated in place, an example of this is the service port. If this is changed, the chart version has be updated or the existing deployment manually removed.
Terraform Kubernetes
Full Stack Release using Terraform
This approach implements the Autonomous Development, Authoritative Release principle, to orchestrate a full stack release, i.e. the automated coordination of Infrastructure as Code, Configuration Management and Application deployment.
This is an alternative implementation to How to Helm, using Terraform instead of Helm, but with the same core principles of runtime versioning and desired state, and the inclusion of the Kubernetes Infrastructure as Code, using a single language, i.e. Terraform.
The Application Stack can be defined once, and deployed many times into separate namespaces, e.g. development, test and production.
graph TD

  subgraph k8s["Kubernetes"]
    subgraph ns1["Dev namespace"]
      ns1-ingress["ingress"]
      subgraph ns1-pod-1["Pod"]
        ns1-con-a["container"]
      end
      subgraph ns1-pod-2["Pod"]
        ns1-con-b["container"]
        ns1-con-c["container"]
      end
    end
    subgraph ns2["Test namespace"]
      ns2-ingress["ingress"]
      subgraph ns2-pod-1["Pod"]
        ns2-con-a["container"]
      end
      subgraph ns2-pod-2["Pod"]
        ns2-con-b["container"]
        ns2-con-c["container"]
      end
    end
    subgraph ns3["Production namespace"]
      ns3-ingress["ingress"]
      subgraph ns3-pod-1["Pod"]
        ns3-con-a["container"]
      end
      subgraph ns3-pod-2["Pod"]
        ns3-con-b["container"]
        ns3-con-c["container"]
      end
    end
  end

  client -->
  ns1-ingress --> ns1-con-a
  ns1-ingress -->
  ns1-con-b --> ns1-con-c

  client -->
  ns2-ingress --> ns2-con-a
  ns2-ingress -->
  ns2-con-b --> ns2-con-c

  client -->
  ns3-ingress --> ns3-con-a
  ns3-ingress -->
  ns3-con-b --> ns3-con-c

classDef external fill:lightblue
class client external

classDef dashed stroke-dasharray: 5, 5
class ns1,ns2,ns3 dashed

classDef dotted stroke-dasharray: 2, 2
class ns1-pod-1,ns1-pod-2,ns2-pod-1,ns2-pod-2,ns3-pod-1,ns3-pod-2 dotted
The key component of the package is the release manifest, this declares the component versions of the solution. The desired state engine (Terraform) will ensure all components for the release align with the declaration in the manifest. These are added to your CDAF.solution file.
While the stack construction is the same in all environments, unique settings for each environment are defined in configuration management files, e.g. properties.cm. The properties management is covered in more detail in the Configuration Management section.
The key construct for the Authoritative Release is that all aspects of the release process are predictable and repeatable. To avoid deploy-time variations in Terraform dependencies, modules are not downloaded at deploy time; instead they are resolved at build time and packaged into an immutable release package. For a consistent way-of-working, the Terraform build process resolves and validates dependencies.
Build-time Module Resolution
Most Terraform module resolution approaches are to pull from source control (Git) or registry at deploy-time, which can require additional credential management, risk unexpected module changes (if tags are used), and introduce potential network connectivity issues. This approach treats modules like software dependencies: resolve them at build time and include them in an all-in-one immutable package.
The following state.tf defines the modules and versions that are required
The following build.tsk triggers module download from a private registry using credentials in TERRAFORM_REGISTRY_TOKEN; these credentials will not be required at deploy time.
Write-Host "[$TASK_NAME] Verify Version`n" -ForegroundColor Cyan
terraform --version
VARCHK
MAKDIR $env:APPDATA\terraform.d
$conf = "$env:APPDATA\terraform.d\credentials.tfrc.json"Set-Content $conf '{'Add-Content $conf ' "credentials": {'Add-Content $conf ' "app.terraform.io": {'Add-Content $conf " `"token`": `"$env:TERRAFORM_REGISTRY_TOKEN`""Add-Content $conf ' }'Add-Content $conf ' }'Add-Content $conf '}'Get-Content $conf
Write-Host "[$TASK_NAME] Log the module registry details`n" -ForegroundColor Cyan
Get-Content state.tf
Write-Host "[$TASK_NAME] In a clean workspace, first init will download modules, then fail, ignore this and init again"if ( ! ( Test-Path ./.terraform/modules/azurerm )) { IGNORE "terraform init -upgrade -input=false" }
Write-Host "[$TASK_NAME] Initialise with local state storage and download modules`n" -ForegroundColor Cyan
terraform init -upgrade -input=false
The trick to use the downloaded, local copy of the modules, is to reference the opinionated location of resolved modules, i.e. ./.terraform/modules/${module_declaration_above}/${registry_name}, as per the following example:
Once all modules have been downloaded, syntax is then validated.
Write-Host "[$TASK_NAME] Validate Syntax`n" -ForegroundColor Cyan
terraform validate

Write-Host "[$TASK_NAME] Generate the graph to validate the plan`n" -ForegroundColor Cyan
terraform graph
Once validated, copy the modules and your .tf files to a release directory, as outlined below, with consideration of numeric token substitution.
Numeric Token Handling
All the deploy-time files are copied into the release directory. Because tokens cannot be used during the build process, an arbitrary numeric is used, and this is then replaced in the resulting release directory. Tokenisation is covered in more detail in the following section.
The deploy-time components are then copied into the release package, based on the storeFor definition in your solution directory.
# Tokenised Terraform Files
release
The modules and helper scripts are then packed into a self-extracting release executable as per standard CDAF release build process
Deploy Time
The build-time state.tf file is replaced at deploy time, replacing the declaration of local storage and removing the build-time module dependencies in your .tsk file.
To De-tokenise this definition at deploy time, name/value pair files are used. This allows the settings to be decoupled from the complexity of configuration file format.
If these were to be stored as separate files in source control, they would suffer the same drift challenge, so in source control, the settings are stored in a tabular format, which is compiled into the name/value files during the Continuous Integration process.
target  aks_work_space  name_space  REGISTRY_KEY       REGISTRY_KEY_SHA
TEST    aks_prep        test        $env:REGISTRY_KEY  FD6346C8432462ED2DBA6...
PROD    aks_prod        prod        $env:REGISTRY_KEY  CA3CBB1998E86F3237CA1...
Note: environment variables can be used for dynamic value replacement, most commonly used for secrets.
These human readable configuration management tables are transformed to computer friendly format and included in the release package (release.ps1). The REGISTRY_KEY and REGISTRY_KEY_SHA are used for Variable Validation, creating a properties.varchk as following
env:REGISTRY_KEY=$env:REGISTRY_KEY_SHA
Write the REGISTRY_KEY_SHA aa a container environment variable, so that when SHA changes, the container is automatically restarted to pick up the environment variable change, and hence the corresponding secret is also reloaded.
env {
  name = "REGISTRY_KEY_SHA"
  value = var.REGISTRY_KEY_SHA
}
An additional benefit of this approach is that when diagnosing an issue, the SHA can be used as an indicative secret verification.
To support the build-once/deploy-many model, the environment specific values are injected and then deployed for the release. Note that the release is immutable, and any change to any component will require a new release to be created, eliminating cherry picking. The tasksRun.tsk performs two levels of detokenisation, the first is for environment specific settings, and the second applies any solution level declarations.
Environment (TARGET) specific de-tokenisation is blue, and solution level de-tokenisation in green:
Terraform Cloud is being used to perform state management. To avoid false negative reporting on Terraform apply, the operation is performed in a CMD shell.
The package can be retrieved using the semantic version, or latest (current production).
To see how this can be consumed in a Release Train approach, see Terraform Cloud.
Custom State Management
Custom Desired State Management Solution
This example provides desired state management to the MuleSoft Anypoint CloudHub 2 platform. As at time of writing, a Terraform provider existed, but was incomplete, having no mechanism to deploy the runtime.
The application stack is made up of individual API definitions, each paired with a runtime component.
The proprietary Mulesoft Anypoint Platform artefact store is called Exchange, and each artefact is called an Asset. Each asset is pushed to the exchange from the autonomous development pipelines. In the examples below, these are GitLab for Windows and Jenkins for Linux. Both use platform independent Maven deploy to push the asset.
The release declaration is in the form of a manifest, specifying each desired component and it’s version.
API                        Runtime
sprint-zero-api=1.0.1      sprint-zero-app=1.2.195
patient-summary-api=1.2.0  patient-summary-app=1.4.114
While the stack construction is the same in all environments, unique settings for each environment are defined in configuration management files, e.g. properties.cm. The properties management is covered in more detail in later sections.
The key construct for the Authoritative Release is that all aspects of the release process are predictable and repeatable. Configuration and helper scripts are packaged into an immutable release. No build process is required, so the minimal CDAF.solution is all that is required, assuming the custom state management is placed in the custom directory within the solution directory, e.g.
The application and environment settings are split into separate configuration management files. Application settings are those which have the same value, for the release, in all environments.
At deploy time, an array is constructed combining the application settings and the environment properties. A SHA-256 hash is generated from each array, to provide an identification mechanism of state, without disclosing any of the settings, some of which maybe sensitive.
After deployment, these are persisted. In this example, they are stored in an Atlassian Confluence page. The advantage of this is that if it is desired to reset an environment after suspected manual interference, the record(s) can be deleted and the deployment rerun.
Once complete, the new current state is persisted.
These can be aggregated in the Wiki to provide a consolidated view for non-technical users
Note that the overarching release number is used as a update comment when writing to the Confluence page, this provides a release history which is visible outside of the toolchain, which is easier to access by business users such as test managers and product owners.
In a large scale environment, a release can include infrastructure, operational and application changes. In Scaled Agile Framework (SAFe) language, the role of coordinating these changes is called the Release Train Engineer (RTE). In many organisations, the coordination of these changes is manual. Automation of this coordination extends the Autonomous Development, Authoritative Release approach to include all aspects of the solution.
Release Train Engineering objectives preserve Autonomous Development, while ensuring the development output assets extend beyond application development, and may include infrastructure, configuration management and test automation.
Fundamental to Release Train Engineering is a Desired State Engine. Examples of these include Terraform, Amazon Cloud Development Kit, Azure Resource Manager/Bicep, Helmsman, Helmfile, Puppet, Ansible, Octopus*.
Intermediary
An intermediary provides a decoupled solution to perform the deployment actions of the release, based on a triggering request from the pipeline. Intermediaries, also known as orchestrators, can provide state management persistence, state reporting and drift remediation.
Octopus does not have a Desired State capability as such, but using a parent project, a release manifest can be constructed, and only child projects which have changed will be deployed. See detailed explanation in Octopus Deploy section.
Subsections of Release Train
Azure DevOps (ADO) Release
Orchestrated Component Deploy
The Application Stack in this example deploys two components, static content and an API.
graph TD

  Agent["🌐"]

  subgraph vm1["☁️ CloudFlare"]
    content["Static Content"]
    API
  end

  Agent --> content
  Agent --> API

classDef external fill:lightblue
class Agent external

classDef dashed stroke-dasharray: 5, 5
class vm1,vm2,vm3,vm4 dashed

classDef dotted stroke-dasharray: 2, 2
class vm1-pod-1,vm1-pod-2,vm2-pod-1,vm2-pod-2,vm3-pod-1,vm3-pod-2,vm4-pod-1,vm4-pod-2 dotted
Each component publishes a self-contained release package to the Azure DevOps (ADO) artefact store. The ADO Release orchestrates these package deployments for each environment, ensuring the complete stack is promoted through each environment with aligned package versions.
graph LR

  subgraph static["Static Content"]
    Sbuild["Build"] -->
    Stest["Test"] -->
    Spublish["Publish"]
  end
  subgraph API
    Abuild["Build"] -->
    Atest["Test"] -->
    Apublish["Publish"]
  end

  subgraph Release
    TEST
    PROD
  end

  store[(ADO Store)]

  Apublish --> store
  Spublish --> store
  store --> TEST
  TEST --> PROD

classDef release fill:lightgreen
class TEST,PROD release
Each component contains both application code and deployment automation. The development team can imperatively deploy to the dev environment, i.e. the API and Vue application can be deployed separately, with no assurance of version alignment.
Example Vue properties.cm file, the deployment tool used is Wrangler.
context    target  pages_app_project  fqdn                 api_url
container  DEV     petstore-dev       vue-dev.example.com  api-dev.example.com

container  TEST    petstore-tst       vue-tst.example.com  api-tst.example.com
container  PROD    petstore-prd       vue.example.com      api.example.com
Example API properties.cm file, the deployment tool used is Terraform.
context    target tf_work_space  pages_suffix
container  DEV    PetStack-Dev   dev
container  TEST   PetStack-Test  tst
container  PROD   PetStack-Prod  prd
Due to the loose-coupling principle of CDAF, the same pipeline template is used for both components, even though the code and deployment automation are different (see orchestration templates in GitHub for Windows and Linux).
note that Jest for Vue and Checkov for Terraform have both been configured to output results in JUnit XML format.
By using the feature-branch.properties capability of CDAF, branches containing the string dev will deploy to the development environment. This feature allows imperative deployment by the development team, without manipulating the pipeline, and therefore avoiding drift.
vue
# Feature Branch name match mapping to environment
dev=DEV
API
# Feature Branch name "contains" mapping to environment
dev=DEV release 'apply --auto-approve'
In the feature branch, where dev is in the branch name, CDAF will detect and execute a deployment, using the mapping above to invoke a release to DEV.
The trunk based pipeline will only push a release artefact from the main branch, with a stand-up/tear-down integration test of the production build.
the final stage of the main pipeline is publication. This pushes the release package to the artefact registry.
Each component publishes their release package, so although they use different technologies, they are now available as consistent packages, using the CDAF package process, which outputs a self-extract release.ps1 (of release.sh for linux) file.
The ADO Release function is used to create a release, and promote it through the environments. The release obtains the components from the artefact store
The Release is defined in order of dependency, i.e. the CloudFlare infrastructure is created/updated and configured with the API, then the front-end is deployed to the infrastructure.
The release itself includes to deployment logic, it simply invokes the packages provided by the component development team.
When a new release is created, the latest versions are defaulted, and this defines the manifest for the release, i.e. different versions cannot be deployed to different environments. This ensures the stack is consistency promoted.
The latest versions do not have to selected, but whatever is selected is static for that release instance.
When the release is promoted, no manual intervention is required, except for approval gates, which can be approved by business or product owners, and does not require any further development effort.
Ansible Automation Platform
Full Stack Release using Ansible Automation Platform
Ansible Automation Platform is the replacement for Ansible Tower.
The Application Stack is a combination of Podman containers with an Apache reverse proxy for ingress.
This implementation does not include infrastructure, i.e. the creation of the host and related networking is not included in the automation, however, it does combine configuration management and software delivery.
graph TD
  client["🌐"]:::transparent

  subgraph dc["Data Center"]
    subgraph vm["Host"]
      Apache
      subgraph Podman
        vm1-con-a["Rails"]
        vm1-con-b["Spring"]
        vm1-con-c["Python"]
      end
    end
  end

  client -->
  Apache --> vm1-con-a
  Apache --> vm1-con-b
  Apache --> vm1-con-c

classDef transparent fill:none,stroke:none,color:black

classDef dashed stroke-dasharray: 5, 5
class dc dashed

classDef dotted stroke-dasharray: 2, 2
class Podman dotted
The configuration of the host and deployment of the application are defined once, and deployed many times, e.g. test and production.
graph LR

  subgraph Rails
    Rbuild["Build"] -->
    Rtest["Test"] -->
    Rpublish["Publish"]
  end
  subgraph Python
    Pbuild["Build"] -->
    Ptest["Test"] -->
    Ppublish["Publish"]
  end
  subgraph Spring
    Sbuild["Build"] -->
    Stest["Test"] -->
    Spublish["Publish"]
  end

  subgraph Release
    TEST:::release
    PROD:::release
  end

  store1[(GitLab Docker Registry)]
  store2[(Nexus Docker Registry)]

  Rpublish --> store1
  Spublish --> store1
  Ppublish --> store2
  store1 --> TEST
  store2 --> TEST
  TEST --> PROD

classDef release fill:lightgreen
Each development team is responsible to publishing a container image, how they do so it within their control, in this example GitLab and ThoughtWorks Go are used by different teams. The GitLab team are branch based, while the Go team are branch based.
Both teams are using CDAF docker image build and push helpers.
The key component of the package is the release manifest, this declares the component versions of the solution. The desired state engine (Ansible) will ensure all components for the release align with the declaration in the manifest. These are added to your CDAF.solution file. To see an example component build, see the Java SpringBoot example.
While that stack construction is the same in all environments, unique settings for each environment are defined in configuration management files, e.g. properties.cm.
The key construct for the Release Train is that all aspects of the release process are predictable and repeatable. To avoid deploy-time variations in Ansible dependencies, playbooks are not downloaded at deploy time; instead they are resolved at build time and packaged into an immutable release package. For a consistent way-of-working, the Ansible build process resolves dependencies and validates the playbooks.
Due to the complexity, a customer build script build.sh is defined, and broken down into the steps below
Sprint Zero
Based on Sprint-Zero, it is critical that a deployment is verifiable by version. A message of the day (motd) file is generated with the build number included so that a user who logs in to the host can verify what version has been applied.
executeExpression "ansible-playbook --version"echo "[$scriptName] Build the message of the day verification file"; echo
executeExpression "cp -v devops/motd motd.txt"propertiesList=$(eval "$AUTOMATIONROOT/remote/transform.sh devops/CDAF.solution")printf "$propertiesList"eval $propertiesList
cat >> motd.txt <<<"State version : ${artifactPrefix}.${BUILDNUMBER}"cat motd.txt
Resolve Dependencies
Playbooks are then downloaded to the release.
common_collections='community.general ansible.posix containers.podman'for common_collection in $common_collections; do executeExpression "ansible-galaxy collection install $common_collection$force_install -p ."done
Validation
Once all playbooks have been downloaded, syntax is then validated.
for play in `find playbooks/ -maxdepth 1 -type f -name '*.yaml'`; do
	executeExpression "ansible-playbook $play --list-tasks -vv"
	for inventory in `find inventory/ -maxdepth 1 -type f`; do
		echo
		echo "ansible-playbook ${play} -i $inventory --list-hosts -vv"
		echo "~~~~~~~~~~~~~~~~~~~~~~~~~~~~~~~~~~~~~~~~~~~~~~~~~~~~~~~~~~~~~~"
		echo
		executeExpression "ansible-playbook ${play} -i $inventory --list-hosts -vv"
	done
done
Release Package
The deploy-time components are then copied into the release package, based on the storeFor definition in your solution directory.
# All Deploy-time Playbooks
release
The playbooks and helper scripts are then packed into a self-extracting release executable as per standard CDAF release build process
At deploy time, the solution manifest and environment settings are applied, the following is an extract from the tower.tsk.
echo "De-tokenise Environment properties prior to loading to Tower"
DETOKN roles/apache-reverse-proxy/vars/main.yml

echo "Resolve global config, i.e. container image version, then environment specific list names"
DETOKN roles/smtp/vars/main.yml
DETOKN roles/smtp/vars/main.yml $WORKSPACE/manifest.txt

DETOKN roles/rails/vars/main.yml
DETOKN roles/rails/vars/main.yml $WORKSPACE/manifest.txt

DETOKN roles/spring/vars/main.yml
DETOKN roles/spring/vars/main.yml $WORKSPACE/manifest.txt
As the Ansible Automation Platform is the intermediary, the declarations need to be moved to intermediary and then the release triggered. In this example, the desired state is continually apply to remediate any drift, but can also be triggered via a command line interface (CLI). The following extract from towerTemplate.sh sets up the configuration
templateID=$(tower-cli job_template list -n "${name}" -f id)
if [ -z $templateID ]; then
	executeExpression "tower-cli job_template create --name '${name}' --inventory '${inventory}' --project '${project}' --playbook '${playbook}' --verbosity more_verbose"
else
	executeExpression "tower-cli job_template modify --name '${name}' --inventory '${inventory}' --project '${project}' --playbook '${playbook}' --verbosity more_verbose"
fi

for credential in $credentials; do
	executeExpression "tower-cli job_template associate_credential --job-template '${name}' --credential ${credential}"
done
once configured, the deployment is triggered.
echo "With Project and Inventory loaded, can now create the Template which links the Inventory, Project, Playbook and Credentials"
${WORKSPACE}/towerTemplate.sh "$TARGET" "$TARGET" "$TARGET" 'playbooks/common.yaml' 'localadmin'

echo "Launch and watch the deployed playbooks"
templateID=$(tower-cli job_template list -n "$TARGET" -f id)
tower-cli job launch --job-template=$templateID
An overview of deployment activity and state management is available in the intermediary user interface.
Octopus Deploy
Release Orchestration using Octopus Deploy
Octopus Deploy is a dedicated release orchestration tool which does not have build capabilities and does not natively integrate with source control, instead it provides a repository to which build artefacts can be pushed. The following scenario is a stack which comprises a customer-facing application (React) front-end and Platform-as-a-Service (Mulesoft Anypoint) back-end.
The back-end deployment is itself an authoritative release solution with a source-driven manifest (see Custom Desired State Management Solution). The client will retrieve the static content from the content delivery network (CloudFlare).
graph TD
  client["🌐"]:::transparent

  subgraph cf["CloudFlare"]
    react-a["Static Content"]
  end

  subgraph ch["CloudHub"]
    patient["Patient API"]
    Admissions["Admissions API"]
  end

  client --> react-a
  client --> patient
  patient --> Admissions

classDef external fill:lightblue
class client external

classDef dashed stroke-dasharray: 5, 5
class cf,ch dashed
Octopus creates a release whenever either the state management or user interface packages are pushed, but this is not deployed into test until the release manager approves. The API construction and registration with AnyPoint exchange is not described here, this is treated as a prerequisite, see Custom Desired State Management Solution for a detailed breakdown of that process.
graph LR

  subgraph "Patient API"
    Rbuild["Build"] -->
    Rtest["Test"] -->
    Rpublish["Publish"]
  end
  subgraph "AnyPoint Desired State Management"
    Pbuild["Build"] -->
    Ptest["Test"] -->
    Ppublish["Publish"]
  end
  subgraph "Admissions API"
    Sbuild["Build"] -->
    Stest["Test"] -->
    Spublish["Publish"]
  end
  subgraph "CloudFlare Pages"
    Abuild["Build"] -->
    Atest["Test"] -->
    Apublish["Publish"]
  end

  subgraph Release
    TEST:::release
    PROD:::release
  end

  store1[(Anypoint Exchange)]
  store2[(Octopus Package Registry)]

  Rpublish --> store1
  Spublish --> store1
  Ppublish --> store2
  Apublish --> store2

  store1 --> TEST
  store2 --> TEST
  TEST --> PROD

classDef release fill:lightgreen
As an intermediary, Octopus provides release gating, orchestration and an overview of the stack components, and what versions have been promoted to which environments.
Parent Project
The parent project does not perform any deployment activity itself, it serves as the orchestrator of the child projects, providing gating and sequencing.
Child Projects
The child project, use the same template process, but each has the release packages that have been build to perform their technology specific deployment process.
Component Independence
The approach above does offer the ability to independently promote or roll-back a child component. This can be beneficial for hot-fixes, however, it is discouraged as it breaks the stack alignment principles of the release train.
The core principle of all the examples in this material is the production of a self-contained, immutable release package. This provides loose coupling with tool chains and re-usability for development environments (see Realising the Feedback Loop).
While Octopus provides a wide range of deployment mechanisms, as a release orchestrator, each child project has the same process, executing the release package for each component against the target environment.
Delivery Lifecycle
Octopus orchestration is called a lifecycle, which is a re-usable pattern. Each child item can use the same lifecycle because the deployment launch process is the same.
While the launch process is the same, each child components underlying technologies can be very different.
After each environment deployment is successful, a Confluence page (one per component/environment) is updated, capturing release details. This provides visibility outside of the toolchain, which is easier to access by business users such as test managers and product owners. Using the content include macro, these pages can be merged.
Terraform Cloud
Full Stack Release using Terraform Cloud
This Release Train extends the Terraform Kubernetesauthoritative release, combining the application stack deployment with the Infrastructure-as-Code solution.
graph TD
  client["🌐"]:::transparent

  apim["API Gateway"]

  subgraph k8s["Kubernetes"]
    subgraph ns1["Dev namespace"]
      ns1-ingress["ingress"]
      subgraph ns1-pod-1["Pod"]
        ns1-con-a["container"]
      end
      subgraph ns1-pod-2["Pod"]
        ns1-con-b["container"]
        ns1-con-c["container"]
      end
    end
  end

  client -->
  apim -->
  ns1-ingress --> ns1-con-a
  ns1-ingress -->
  ns1-con-b --> ns1-con-c

classDef external fill:lightblue
class client external

classDef dashed stroke-dasharray: 5, 5
class ns1,ns2,ns3 dashed

classDef dotted stroke-dasharray: 2, 2
class ns1-pod-1,ns1-pod-2,ns2-pod-1,ns2-pod-2,ns3-pod-1,ns3-pod-2 dotted
Each component publishes a self-contained release package to the Azure DevOps (ADO) artefact store. The ADO Release orchestrates these package deployments for each environment, ensuring the complete stack is promoted through each environment with aligned package versions.
graph LR

  subgraph Components
    Sbuild["Build"] -->
    Stest["Test"] -->
    Spublish["Publish"]
  end
  subgraph Infrastructure
    Abuild["Build"] -->
    Atest["Test"] -->
    Apublish["Publish"]
  end

  subgraph Release
    TEST
    PROD
  end

  store[(ADO Store)]

  Apublish --> store
  Spublish --> store
  store --> TEST
  TEST --> PROD

classDef release fill:lightgreen
class TEST,PROD release
The key component of the package is the release manifest, this declares the component versions of the solution. The desired state engine (Terraform) will ensure all components for the release align with the declaration in the manifest. These are added to your CDAF.solution file.
While the stack construction is the same in all environments, unique settings for each environment are defined in configuration management files, e.g. properties.cm. The properties management is covered in more detail in the Configuration Management section.
The key construct for the Authoritative Release is that all aspects of the release process are predictable and repeatable. To avoid deploy-time variations in Terraform dependencies, modules are not downloaded at deploy time; instead they are resolved at build time and packaged into an immutable release package. For a consistent way-of-working, the Terraform build process resolves and validates dependencies.
Build-time Module Resolution
Most Terraform module resolution approaches are to pull from source control (Git) or registry at deploy-time, which can require additional credential management, risk unexpected module changes (if tags are used), and introduce potential network connectivity issues. This approach treats modules like software dependencies: resolve them at build time and include them in an all-in-one immutable package.
The following state.tf defines the modules and versions that are required
The following build.tsk triggers module download from a private registry using credentials in TERRAFORM_REGISTRY_TOKEN; these credentials will not be required at deploy time.
Write-Host "[$TASK_NAME] Verify Version`n" -ForegroundColor Cyan
terraform --version
VARCHK
MAKDIR $env:APPDATA\terraform.d
$conf = "$env:APPDATA\terraform.d\credentials.tfrc.json"Set-Content $conf '{'Add-Content $conf ' "credentials": {'Add-Content $conf ' "app.terraform.io": {'Add-Content $conf " `"token`": `"$env:TERRAFORM_REGISTRY_TOKEN`""Add-Content $conf ' }'Add-Content $conf ' }'Add-Content $conf '}'Get-Content $conf
Write-Host "[$TASK_NAME] Log the module registry details`n" -ForegroundColor Cyan
Get-Content state.tf
Write-Host "[$TASK_NAME] In a clean workspace, first init will download modules, then fail, ignore this and init again"if ( ! ( Test-Path ./.terraform/modules/azurerm )) { IGNORE "terraform init -upgrade -input=false" }
Write-Host "[$TASK_NAME] Initialise with local state storage and download modules`n" -ForegroundColor Cyan
terraform init -upgrade -input=false
Validation
Once all modules have been downloaded, syntax is then validated.
Write-Host "[$TASK_NAME] Validate Syntax`n" -ForegroundColor Cyan
terraform validate

Write-Host "[$TASK_NAME] Generate the graph to validate the plan`n" -ForegroundColor Cyan
terraform graph
Numeric Token Handling
All the deploy-time files are copied into the release directory. Because tokens cannot be used during the build process, an arbitrary numeric is used, and this is then replaced in the resulting release directory. Tokenisation is covered in more detail in the following section
To De-tokenise this definition at deploy time, name/value pair files are used. This allows the settings to be decoupled from the complexity of configuration file format.
If these were to be stored as separate files in source control, they would suffer the same drift challenge, so in source control, the settings are stored in a tabular format, which is compiled into the name/value files during the Continuous Integration process.
target  aks_work_space  name_space  REGISTRY_KEY       REGISTRY_KEY_SHA
TEST    aks_prep        test        $env:REGISTRY_KEY  FD6346C8432462ED2DBA6...
PROD    aks_prod        prod        $env:REGISTRY_KEY  CA3CBB1998E86F3237CA1...
Note: environment variables can be used for dynamic value replacement, most commonly used for secrets.
These human readable configuration management tables are transformed to computer friendly format and included in the release package (release.ps1). The REGISTRY_KEY and REGISTRY_KEY_SHA are used for Variable Validation, creating a properties.varchk as following
env:REGISTRY_KEY=$env:REGISTRY_KEY_SHA
Write the REGISTRY_KEY_SHA aa a container environment variable, so that when SHA changes, the container is automatically restarted to pick up the environment variable change, and hence the corresponding secret is also reloaded.
env {
  name = "REGISTRY_KEY_SHA"
  value = var.REGISTRY_KEY_SHA
}
An additional benefit of this approach is that when diagnosing an issue, the SHA can be used as an indicative secret verification. How these are consumed are described later in the deploy section.
The release combines the Infrastructure-as-Code (IaC) Continuous Integration (CI) output with the application components from Terraform Authoritative Release. The application authoritative release package (in green below) declares the image versions to be deployed to the infrastructure provided by the IaC release package.
graph LR
  Key["Legend<br/>Blue - IaC & CM<br/>Green - Application Stack"]

  subgraph ado["Azure DevOps"]
    git[(Git)]
    build-artefact[(Build)]
    iac["release.ps1"]
    package-artefact[(Artifacts)]
    app["release.ps1"]
  end

  subgraph az["Azure"]
    qa
    pp
    pr
  end

  registry[(Docker Registry)]

  git --CI--> build-artefact
  build-artefact --CD--> iac

  package-artefact --CD--> app

  registry -. "pull image" .-> qa
  app -. "terraform apply" .-> qa
  iac -. "terraform apply" .-> qa

  classDef infra fill:LightBlue
  class iac,az infra

  classDef app-stack fill:LightGreen
  class registry,app app-stack
In this example, the application release pipeline only deploys to the development environment to verify the package, and then pushes to the artefact store
The package, based on its semantic version, is pulled from this store at deploy time, based on the solution manifest, CDAF.solution.
artifactPrefix=0.5
productName=Azure Terraform for Kubernetes
solutionName=azt

kat_release=0.4.80
the two release artefacts are promoted together through the pipeline
The deployment process itself is processed via the Terraform Cloud intermediary, which decouples the configuration management, and provides state storage and execution processing.
.
An important aspect of the intermediaries function is to store dynamic outputs, for example, the Infrastructure-as-Code solution provides a Kubernetes cluster, the dynamically created configuration is stored as outputs.
.
The outputs are made available to the subsequent application deployment process.
.
The Application components consume the state information that has been shared
To support the build-once/deploy-many model, the environment specific values are injected and then deployed for the release. Note that the release is immutable, and any change to any component will require a new release to be created, eliminating cherry picking. The tasksRun.tsk performs multiple levels of detokenisation, the first is for environment specific settings, the second applies any solution level declarations, then cluster, groups/regions and non-secret elements of the credentials
Environment (TARGET) specific de-tokenisation is blue, and solution level de-tokenisation in green:
Cluster de-tokenisation is blue, group/region de-tokenisation in green and on-secret elements of the credentials in orange:
Terraform Cloud is being used to perform state management. To avoid false negative reporting on Terraform apply, the operation is performed in a CMD shell.
Write-Host "[$TASK_NAME] Azure Secrets are stored in the back-end, the token opens access to these"
MAKDIR "$env:APPDATA\terraform.d"
$conf = "$env:APPDATA\terraform.d\credentials.tfrc.json"
Set-Content $conf 'credentials "app.terraform.io" {'
Add-Content $conf "  token = `"$env:TERRAFORM_TOKEN`""
Add-Content $conf '}'

Write-Host "[$TASK_NAME] Replace Local State with Remote, load env_tag from $azure_groups"
PROPLD $azure_groups
$remote_state = "state.tf"
Set-Content $remote_state 'terraform {'
Add-Content $remote_state '  backend "remote" {'
Add-Content $remote_state "    organization = `"${env:TERRAFORM_ORG}`""
Add-Content $remote_state '    workspaces {'
Add-Content $remote_state "      name = `"${SOLUTION}_${resource_group}`""
Add-Content $remote_state '    }'
Add-Content $remote_state '  }'
Add-Content $remote_state '}'

terraform init -upgrade -input=false

Write-Host "[$TASK_NAME] Default action is plan`n" -ForegroundColor Cyan
if ( ! $OPT_ARG ) { $OPT_ARG = 'plan' }
EXECMD "terraform $OPT_ARG"
Once the infrastructure has been deployed, the application components are installed. The release package is downloaded (in this example an container with the AZ extensions pre-installed is used) and then run for the environment.
The package can be retrieved using the semantic version, or latest (current production).
Operations
Operational tasks can be performed using the production (latest) or specific release. In this example, a production-like development environment can be created and destroyed on demand.
Reference Guide
Continuous Delivery Automation Framework features are opinionated and configuration driven. See the introduction material for step-by-step guidance.
CDAF providers 4 entry scripts for different purposes.
ci : Build and Package only, i.e. Continuous Integration, mandatory argument is BUILDNUMBER
cd : Release, i.e. Continuous Delivery or Deploy (depending on gating or not), mandatory argument is ENVIRONMENT
cdEmulate : Executes ci and then cd, generates BUILDNUMBER if not supplied and uses configurable ENVIRONMENT
entry : Executes ci and then cd, generates BUILDNUMBER if not supplied and uses configurable ENVIRONMENT(s)
The CI entry point (ci.bat/ci.sh) will perform the build and package process. Recommended configuration is to produce a self extracting deployable artefact (release.ps1/release.sh).
sequenceDiagram
  ci ->>+ buildPackage: BUILDNUMBER
  buildPackage ->>- ci: release
CD Emulation
The CD Emulation (cdEmulate.bat/cdEmulate.sh) is a simple wrapper which performs the CI process, and then executes the CD process, using the configured or default environment.
The entry wrapper (entry.bat/entry.sh), similar to cdEmulate, performs the CI process and CD process. The CD process however supports additional, optional, configuration for releases based on branch name (substrings).
sequenceDiagram
  cdEmulate ->>+ buildPackage: BUILDNUMBER
  buildPackage ->>- cdEmulate: release
  loop for each matching branch name
    cdEmulate ->>+ release: ENVIRONMENT
    release ->>- cdEmulate: deployment results
  end
The CDAF execution engine allows the DevOps Engineer to focus on the primary objective, and not have to cater for logging, exception and error handling. Within this engine are a set of operations for common problems, further allowing a focus on results and rewriting/copying scripts. See Execution Engine documentation.
Note: The following is details a subset of CDAF capabilities, describing a common usage, For a detailed breakdown of each component, see the CDAF Reference Guide.
sequenceDiagram
  autonumber
  participant entry point
  participant buildPackage
  participant buildProjects
  participant execute
  participant package

  entry point ->>+ buildPackage: BUILDNUMBER
    Note right of buildPackage: "Build" Process Begins
    buildPackage ->> buildPackage: Property Translation (properties.cm)
    loop for each Directory containering build.tsk
      Note right of buildPackage: "Project" is a historical name <br/> from Eclipse & Visual Studio
      buildPackage ->>+ buildProjects: Project Name
      buildProjects ->>+ Transform: Load Properties
      Transform ->>- buildProjects: propertyList
      buildProjects ->>+ execute: build.tsk
      loop for each Line in build.tsk
        Note right of execute: Build commands, such as <br/> MSBuild, NPM, etc.
        execute ->> execute: log, execute and manage errors
      end
      execute ->>- buildProjects: build artefacts
      buildProjects ->>- buildPackage: build complete
    end

    Note right of buildPackage: "Package" Process Begins
    buildPackage ->>+ package: projectName
    package ->>+ Transform: Load Properties
    Transform ->>- package: propertyList
    package ->>- buildPackage: project complete
    buildPackage ->>+ packageLocal: prepare release
      packageLocal ->> packageLocal: Gather CDAF SCripts <br/> and deploy properties
      packageLocal ->> packageLocal: Gather user defined artefacts
    packageLocal ->>- buildPackage: artefacts
    buildPackage ->> buildPackage: generate self-extract release
  buildPackage ->>- entry point: release.ps1 or release.sh
Feature Configuration
Declarative Desired State Container Deployment using Helm
This section provides a detailed breakdown of the Continuous Delivery Automation Framework (CDAF) feature configuration options. For a step-by-step usage guide see getting started.
The local and remote configuration will trigger a task execution based on each unique declaration of context and target, using the corresponding default task tasksRunLocal.tsk and tasksRunLocal.tsk.
context  target  deployHost
remote   UAT     vm.example.com
local    UAT     vm.example.com
remote   PROD    vm.example.com
local    PROD    vm.example.com
Customer tasks can be defined for directories customLocal and customRemote respectively, or custom if shared.
To alleviate the burden of argument passing, exception handling and logging, the execution engine has been provided. The execution engine will essentially execute the native interpretive language (PowerShell or bash), line by line, but each execution will be tested for exceptions (trivial in bash, significantly more complex in PowerShell).
Where is it used
In all places using .tsk files, i.e. build, package, wrap and deploy. The following operations are available to all tasks, however, some are more applicable to specific processes, see Build, Local and Remote task execution for more details of how these can be used.
Operations
The following operations are provided to simplify common tasks.
Keyword
Description
Example
ASSIGN
Display, and expand as necessary, variable assignment
ASSIGN $test="$varcontainingvar"
CMPRSS
Compress directory to file
CMPRSS packageName dirName
DCMPRS
Decompress package file
DCMPRS packageName
DECRYP
decrypt using private key (PKI)
DECRYP crypt/encrypt.dat
decrypt using AES/GPG key
DECRYP crypt/encrypt.dat $key
DETOKN
Detokenise file with target prop
DETOKN token.yml
Detokenise with specific file
DETOKN token.yml PROP_FILE
Detokenise with encrypted file
DETOKN token.yml crypt/FIL $key
Expand and reveal embedded variables and detokenise
DETOKN token.yml $TARGET reveal
Expand but do not reveal embedded variables and detokenise
DETOKN token.yml manifest.txt resolve
EXCREM
Execute command
EXCREM hostname
Execute script
EXCREM ./capabilities.sh
EXERTY
Execute Retry, wait 10 seconds and retry twice
EXERTY “temperamentalcommand”
Optional, wait and retry override
EXERTY “verytemperamentalcommand” 20 5
EXITIF
Exit normally if argument set
EXITIF $ACTION
Exit normally if set to value
EXITIF $ACTION clean
IGNORE
Execute expression, log and ignore errors
IGNORE “command arg1 arg2”
IMGTXT
Display image file as text (wrapper for jp2a in Linux)
IMGTXT sample.jpg
INVOKE
call a custom script
INVOKE ./script “Hello”
MAKDIR
Create a directory and path (opt)
MAKDIR directory/and/path
MASKED
Return an uppercase hexadecimal checksum using SHA256
MASKED $password
MD5MSK
Deprecated. Return an uppercase hexadecimal checksum
MD5MSK $password
PROPLD
Load properties as variables
PROPLD PROP_FILE
Expand and reveal embedded variables
PROPLD $TARGET reveal
Expand but do not reveal embedded variables
PROPLD manifest.txt resolve
REFRSH
Refresh directory contents
REFRSH manifest.txt ~/temp_dir
clear directory contents (create if not existing)
REFRSH ~/temp_dir
REMOVE
Delete files, including wildcard
REMOVE *.war
REPLAC
Replace token in file
REPLAC fileName %token% $value
VARCHK
Variable validation using default file properties.varchk
VARCHK
Variable validation using names file
VARCHK vars.properties
VECOPY
Verbose copy
VECOPY *.war
Notes on EXCREM use, the properties are similar to those used for remote tasks, where the minimum required is the host, if other properties are not used, must be set to NOT_SUPPLIED, i.e.
The following operations are only available in PowerShell version
Keyword
Description
Example
CMDTST
Returns true if command exists
CMDTST vagrant
ELEVAT
Execute as elevated NT SYSTEM
ELEVAT “$(pwd)/custom.ps1”
EXECMD
Execute in Command (CMD) shell
ELEVAT “terraform $OPT_ARG”
MSTOOL
Microsoft Build Tools, set environment variables • MS_BUILD • MS_TEST • VS_TEST • DEV_ENV • NUGET_PATH
MSTOOL
Common Variables
These are automatically set at both build and deploy time.
Variable
Description
$SOLUTIONROOT
The solution directory identified by location of CDAF.solution file
$SOLUTION
The solution name identified by property in CDAF.solution file
$BUILDNUMBER
The first argument passed for CI, and propagated to CD
$CDAF_CORE
Core CDAF runtime location
$TASK_NAME
The name of the task file currently executing
$TARGET
Available in both build and deploy, but derived differently, see below for details
Build-time Variables
These are automatically set at execution start-up
Variable
Description
$AUTOMATIONROOT
The installation directory of the Continuous Delivery Automation Framework
$ACTION
The second argument passed, has some hardcoded functions • clean: only remove temp files • packageonly: skip any build tasks
$TARGET
At build time, this is derived (Can be overridden, see CDAF_BUILD_ENV environment variable) • Linux: Set to WSL for Windows Subsystem, otherwise LINUX • Windows: Set to WINDOWS is on-domain, otherwise WORKGROUP
Due to inconsistencies between Windows and Linux handling of environment variables, these have been divided between environment variables that are set before calling an entry script to alter the behaviour of CDAF, and environment variables that are set within bash scripts to make them globally available.
Control Variables
The following environment variables are available to control the behaviour of CDAF
Variable
Description
CDAF_BRANCH_NAME
Used by entry.ps1/entry.sh Override the branch name, primarily to test CI behaviour for non-default branch, i.e. main
Prefix used in containerBuild to supply local variables into the build time container
CDAF_CD_{variable_name}
Prefix used in containerDeploy to supply local variables into the deploy time container
CDAF_IB_{variable_name}
Prefix used in containerBuild to supply during image construction
CDAF_OPT_{any_value}
Prefix used in containerDeploy to set docker run options e.g. $env:CDAF_OPT_foo = ‘–cpu-count 2’ $env:CDAF_OPT_bar = ‘–label custom=release’
CDAF_DOCKER_REQUIRED
containerBuild will attempt to start Docker if not running and will fail if it cannot, rather than falling back to native execution
CDAF_DOCKER_RUN_ARGS
containerBuild additional run arguments, e.g. ‘–memory=2048m’
CDAF_DELIVERY
The default target environment for cdEmulate and entry, defaults are LINUX, or WINDOWS for on-domain or WORKGROUP for off-domain
CDAF_ERROR_DIAG
Dependency injected custom call if error occurs in Execution Engine
CDAF_HOME_MOUNT
to disable volume mount for containerDeploy set to ’no’, note: this can be overridden a solution level, using CDAF_HOME_MOUNT as property
CDAF_IGNORE_WARNING
If messages are logged to standard error, the Execution Engine will log but not halt, however is this is set to yes, processing will halt yes or no, default is yes
CDAF_LOG_LEVEL
Set to DEBUG for verbose logging
CDAF_OVERRIDE_TOKEN
Default marker for DETOKN or PROPLD in Execution Engine is %, i.e. %key_name%, the markers can be changed using this environment variable
CDAF_SKIP_CONTAINER_BUILD
containerBuild will not be performed if this environment variable is set to any value
CDAF.solution : file to identify a directory as the automation solution directory where the key configuration files are placed. This file is used as the bases of the manifest.txt file while is included in the resulting CI artefact package.
See solution/CDAF.solution in CDAF automation directory.
Solution Properties
Variable
Description
solutionName
Required. Do not include spaces.
productName
Solution description, this can contain spaces.
artifactPrefix
Generate a self-extracting package script, example 0.0, mutually exclusive to productVersion
productVersion
Do a self-extracting package script, example 0.0.0
containerBuild
Dependency injection for running container based build execution
containerImage
Image to be used in the container based build execution
containerDeploy
Execute deployment from within a container, uses the storeForRemote artefact definition
imageBuild
Dependency injection for creating a container image after CI process, see the Image Registry properties below
runtimeImage
Image to used in the runtime image created by imageBuild
constructor
Directory in which container images are constructed, default action will traverse and build in all directories
defaultBranch
Used to determine feature branch functionality, default is master
Deployment Process Sequence, defaults to localTasks, remoteTasks and finally containerTasks
Environment Variable Substitution
The following properties can be used in place of environment variables
Variable
Description
CDAF_HOME_MOUNT
to disable volume mount for containerDeploy set to ’no'
CDAF_ERROR_DIAG
Dependency injected custom call if error occurs in Execution Engine
CDAF_DOCKER_REQUIRED
containerBuild will attempt to start Docker if not running and will fail if it cannot, rather than falling back to native execution
Image Registry
These properties are used to push the image created by dockerBuild to pull a base image from a private registry. These can be overridden by Environment Variables.
Variable
Description
CDAF_SKIP_PULL
Skip updating of image
CDAF_PULL_REGISTRY_URL
Image registry URL, example myregistry.local (do not set for dockerhub)
CDAF_PULL_REGISTRY_USER
Registry user, example registryuser (if not set, default is ‘.’)
CDAF_PULL_REGISTRY_TOKEN
Registry token, example xyzx9234sxsrwcqw34
These properties are used to push the image created by imageBuild to push to a private registry. These can be overridden by Environment Variables.
Variable
Description
CDAF_REGISTRY_URL
Image registry URL, example myregistry.local (do not set for dockerhub)
CDAF_REGISTRY_TAG
Image tag(s), can be a single value latest (default) or space separated list, e.g. latest ${BUILDNUMBER}
CDAF_REGISTRY_USER
Registry user, example registryuser (if not set, default is ‘.’)
CDAF_REGISTRY_TOKEN
Registry authentication token
These properties are used to push the image created by dockerPush to push to a private registry. These can be overridden by Environment Variables.
Variable
Description
CDAF_PUSH_REGISTRY_URL
Image registry URL, example myregistry.local (do not set for dockerhub)
CDAF_PUSH_REGISTRY_TAG
Image tag(s), can be a single value latest (default) or space separated list, e.g. latest ${BUILDNUMBER}
CDAF_PUSH_REGISTRY_USER
Registry user, example registryuser (if not set, default is ‘.’)
CDAF_PUSH_REGISTRY_TOKEN
Registry authentication token
Git Clean-up Properties
To clean-up Git branches and docker images, the following properties are used.
Variable
Description
gitRemoteURL
https://gitserver.local/mysolution.git
gitUserNameEnvVar
gituser
gitUserPassEnvVar
secret-pat
gitCustomCleanup
& $AUTOMATIONROOT/buildandpackage/clean.ps1 or $AUTOMATIONROOT/buildandpackage/clean.sh
Place feature-branch.properties in your SOLUTIONROOT to allow dynamic delivery execution, based on Git Branch name. This capability is limited to entry.sh/entry.bat/entry.ps1, which are Git aware, and the recommended loose coupling entry scripts for CDAF.
# Separate environments for features and bugs
feature=DEV1
bugfix=DEV2

# Hotfixes deploy to all environments
hotfix=DEV1
hotfix=DEV2
See CDAF Samples for complete implementations in Linux and Windows.
A key approach to support the principle of automation execution in a local desktop context, is the use of environment variables. It’s important to remember that environment variables do not necessarily need to be persisted, i.e. stored unencrypted on disk, it’s the global availability of the variable that makes it an environment variable.
context  target  databaseFQDN        dBpassword
local    TEST    db1.nonprod.local   $DB1_PASSWORD
local    UAT     db2.nonprod.local   $DB2_PASSWORD
local    PROD    cluster.prod.local  $PRD_PASSWORD
Variable Expansion
Variables can be referenced in preoperties files (see [Configuration Management][mydoc_basics_configuration_management]) or CDAF.solution file and then expanded at deploy time into variables or files using ASSIGN, PROPLD or DETOKN in the execution engine.
Encrypted Files
This approach is to allow secrets in a file to be stored in source control. Encryption key for Windows is an EAS key, while for Linux it’s a GPG key. This approach is used when there are a large number of secrets to cater for, and therefore only the key needs to be managed as a secret.
In early generations of secret management, the secrets would be stored as persistent environment variables, however all modern toolsets provide an encrypted store which can load secrets as environment variables.
See the DECRYP & DETOKN operations in the execution engine for guidance on usage.
Cloud Storage Integration
Toolset providers who also supply public cloud provide integration to their secret storage offerings, while these can be convenient, this does couple your automation to toolset and makes the execution of locally challenging.
Machine to machine deployments are increasingly uncommon, as local agents/runners are readily available, making on-premise deployments from the build server an infrequent use case. While there is no plan to deprecate this capability, it’s complexity makes local testing i.e. shift-left complicated, especially in windows. For CDAF configuration, see Remote Tasks.
Windows Remote PowerShell
This approach uses the local host for both target (CD) and build (CI) execution. Provision the host with both roles
.\automation\provisioning\mkdir.ps1 C:\deploy
.\automation\provisioning\CredSSP.ps1 server

.\automation\provisioning\trustedHosts.ps1 *
.\automation\provisioning\CredSSP.ps1 client
Linux SSH
Generate PKI key and public certificate, and perform a loop-back connection to local host to place the public certificate in the authorised hosts configuration.
With the implementation of 12-Factor applications, secret management in files is less common, and the storage of encrypted files in source control for subsequent decryption is now uncommon. While this capability is not planned for deprecation, it is recommended to use sensitive data strategies instead.
There are 5 rules available, two for plain text and three for secrets. When validating a secret against a known MD5 value, either a literal or variable can be supplied. See VARCHK in the execution engine operations
# Plain text values
OPT_ARG                                # Optional plain text
terraform_version=required             # Required plain text

# Secret values
TERRAFORM_TOKEN=optional               # Optional secret
TERRAFORM_TOKEN=secret                 # Required secret
TERRAFORM_TOKEN=$TERRAFORM_TOKEN_MASK  # Required secret verified against supplied SHA-256 value
Docker Features
Container Exploitation and Image Building
These features provide opinionated wrappers for using docker to perform the following:
containerBuild : to execute build processes in a pre-provisioned, or custom provisioned container
imageBuild : to create images for publication
containerDeploy : to execute deployment processes in a pre-provisioned, or custom provisioned container
Pre-provisioned images are available in DockerHub.
Some CI/CD pipeline toolsets support native capability (GitLab, BitBucket) to execute with a container. In other some cases, (CircleCI, Travis) all pipeline activity can only be executed within containers.
For toolsets which do not support this functionality, but do allow for self-hosted agents or where a self-hosted agent is preferred/mandated i.e. execution within a private network, the CDAF container helpers can provide consistency for construction, execution and housekeeping.
Even with a toolset uses containers, if they support docker-in-docker, the CDAF container helpers can still be utilised.
The containerBuild option allows the execution of the build process from within a container. Unlike toolsets which reference a image that is used to create the build container, CDAF uses a Dockerfile, for the following advantages:
Build Prerequisites can be defined in code, without being limited to available published images
Once constructed the image image cache provides improved performance, without having to use a image registry
Working directory and user home directory are volume mounted, to allow caching of build dependencies, e.g. Maven, node_modules
Container Build Configuration
To execute the build within a container, add the containerBuild definition and containerImage to CDAF.solution. Note: complete definitions are provided in the GitHub samples for Windows and Linux.
The following samples have the default process commented out, and can be used to define a custom process.
To supply variables to the build process, prefix with CDAF_CB_ (see CDAF Environment Variables) and the variables will be mapped into the build container.
See GitHub samples for Windows and Linux for dockerfile and additional properties.
Like containerBuild, containerDeploy provides both image build and container task execution. The common use for container deploy where a command line interface is required.
Master of Deployment Success
The containerDeploy option allows the execution of the deploy process from within a container. Unlike toolsets which reference a image that is used to create the deploy container, CDAF uses a Dockerfile, for the following advantages:
Deploy Prerequisites can be defined in code, without being limited to available published images
Once constructed the image image cache provides improved performance, without having to use a image registry
Container Deploy Configuration
To execute the deploy within a container, add the containerDeploy definition and runtimeImage (if not supplied, containerImage will be used) to CDAF.solution. Note: complete definitions are provided in the GitHub samples for Windows and Linux.
The following samples have the default process commented out, and can be used to define a custom process.
To supply variables to the build process, prefix with CDAF_CD_ (see CDAF Environment Variables) and the variables will be mapped into the build container.
See GitHub samples for Windows and Linux for dockerfile and additional properties.
Custom Image
The default directory used for container deploy is containerDeploy, if this is not found, the default Dockerfile is used, with the default runtime files. If you have your own Dockerfile in containerDeploy, or a custom directory specified in CDAF.solutioncontainerDeploy property, then that will be used.
Runtime Files
The release.sh file is included in the default image, however, if using a default image, this needs to be explicitly defined in CDAF.solutionruntimeFiles property. This can be a space separated list of files.
runtimeFiles=$WORKSPACE_ROOT/release.sh
Runtime Retain
To skip image clean-up, set CDAF.solutionruntimeRetain property.